The latest Windows 11, version 22H2, has two new personalization options for students. The education themes and desktop stickers available in Windows 11 help students personalize their desktops. According to Microsoft, when students apply these themes and stickers on their Windows 11 PC, they feel the device is their own. When students feel more ownership over their devices, they tend to take better care of them.

Desktop Stickers and education themes are part of Windows 11 SE version 22H2. It is the stripped-down version of Microsoft’s Windows 11 operating system, with some features removed to help students focus on their education. Desktop Stickers and education themes are also available on other Windows 11 versions. Here is how to enable them.
ALSO READ: How to Enable Education Themes in Any Windows 11 Device
How to Enable Desktop Stickers in Windows 11 22H2?
1. Open Registry Editor on your Windows 11 computer.
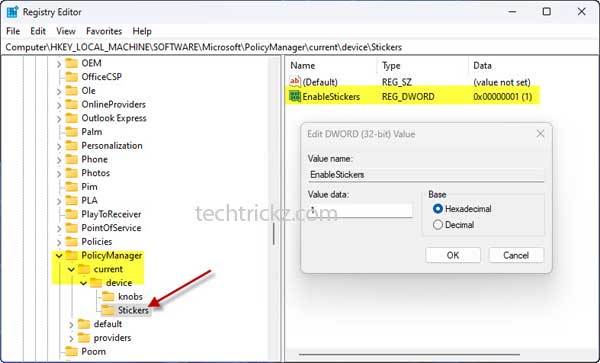
2. Navigate to Computer\HKEY_LOCAL_MACHINE\SOFTWARE\Microsoft\PolicyManager\current\device.
3. Right-click on the Device, select New, and then Key. Name it Stickers.
4. Next, right-click the new Stickers key, and choose New > DWORD (32-Bit) Value. Name it EnableStickers.
5. Double-click on the EnableStickers on the right pane of the registry editor.
6. The default value will be 0. Change its value to 1 and click the OK button to save the changes.
7. Close the Registry Editor and Restart your computer to apply the changes.
Warning: Editing Registry can cause seriuos issues to your computer, if edited wrongly. Please follow the above guide at your own risk. We can’t take responsibility for anything that goes wrong. This guide is intended for technically talented users only.
You have to enable desktop stickers on your Windows 11 PC. Here is how to add stickers to your desktop.
How to Add Stickers to Desktop in Windows 11?
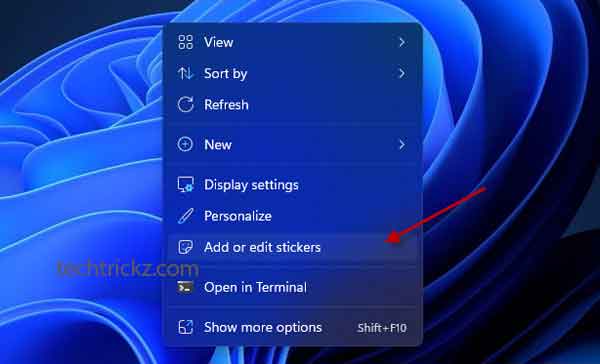
1. Right-click on the desktop and select the Add or edit stickers option from the context menu.
2. It will open Stickers Editor on the desktop.
3. Here choose from over 500 cheerful, education-friendly digital stickers and apply them on your desktop.
4. To save your sticker and close the sticker editor, click the X button at the top of the screen.
You can select multiple stickers for your desktop and resize, move, and delete stickers using the Stickers Editor window. And each sticker remains, even when the background changes.
Note: To remove the Desktop Stickers option from your Windows 11 PC, repeat the steps 1 to 4, delete the newly created Stickers key and restart the PC.
More Resources:


