Spotlight is a feature of Windows 11 that automatically changes the Lock screen and desktop wallpapers of the system by downloading beautiful images from the cloud. It will bring a refreshing look every day onto the desktop.
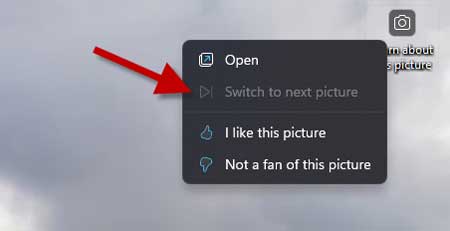
One of the features of the Windows Spotlight is that it lets you change the current spotlight wallpaper if you do not like it. Rght-click the camera icon and click on the Switch to the next picture option to change the wallpaper.
However, for some users, the Switch to the next picture option is grayed out in Windows 11. So they will not be able to switch to new images. Here is how to fix the Windows Spotlight glitch that disables the Switch to the next picture option in windows 11.
ALSO READ: Enable Education Themes in Any Windows 11 Device
How to Fix Windows Spotlight Switch To Next Picture Option is Grayed Out?
There is no exact reason for the Windows Spotlight glitch that grays out the Switch to Next Picture option in Windows 11. A simple restart of the PC or the Windows Repair feature will fix this glitch. However, if that does not help, Restarting, deleting, and resetting the Windows spotlight assets will fix the issue.
How to Restart Windows Spotlight Assets in Windows 11?
1. Right-click on the desktop and select the Personalize option.
2. In Personalization, click on the drop-down menu next to Background.
3. Next, click the Personalize your background drop-down menu, select Picture, and restart your PC.
4. After restarting the PC, repeat the above steps and select the Windows spotlight.
If the above method does not fix your issue, deleting Spotlight Assets may fix it. Here is how to do it.
How to Delete Windows Spotlight Assets in Windows 11?
1. First, switch to Picture mode in Windows Background settings.
2. Next, turn on the Show hidden files, folders, and drives option in File Explorer.
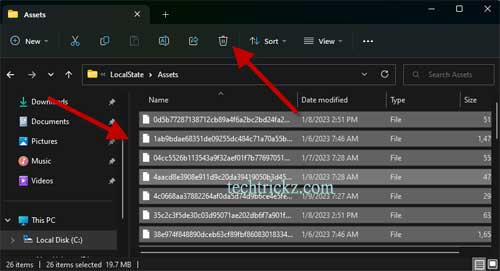
3. Now, go to C: > Users > [User name] > AppData > Local > Packages > Microsoft.Windows.ContentDeliveryManager > LocalState > Assets.
4. Select all the files inside this folder using CTRL + A shortcut and click the Delete button.
5. Restart your PC and go to Background settings and select Windows spotlight.
If the above method does not fix your issue, resetting Spotlight settings may fix it. Here is how to do it.
How to Reset Windows Spotlight Settings in windows 11?
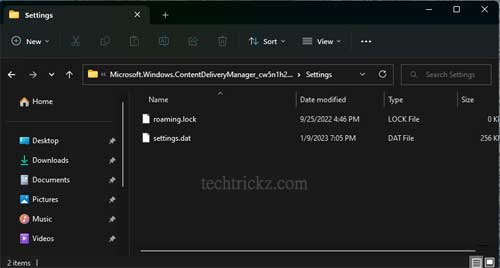
1. Go to C: > Users > [User name] > AppData > Local > Packages > Microsoft.Windows.ContentDeliveryManager > Settings.
2. You will see the ‘roaming. lock‘ and ‘settings.dat‘ files. Change their name to ‘roaming.lock.old’ and ‘settings.dat.old.
3. Next, restart your computer to reset the Spotlight setting.
4. Now,go to the Background settings and select Windows Spotlight. It will fix the issue.
If you are still facing the Spotlight problem in your Windows 11 system, then you may use the Repair Windows 11 or if it fails, then Reset Windows 11 options. It will fix the Windows Spotlight glitch that disables the Switch to the next picture option in windows 11.
More Resources:


