Modern Android smartphones have built-in Global positioning system (GPS), and a few of them even supports all regions satellites, such as NavIC, Glonass, Galileo, and BeiDou. The predominant use of GPS on Android phone is for navigation, but it is also necessary for playing some games and device tracking. However, the GPS on your phone can run into problems, and you may need help to fix it.
Usually, GPS problem is uncommon on Android smartphones, but in rare cases, it can happen. If your navigation app, such as Google Maps, doesn’t get the location accurately or takes a too long time to lock into a GPS location when playing some games on your device, it means your phone has GPS problem.
This guide will help you to fix the GPS problem in your Android phone. You can test these methods on any smartphone brand, such as Xiaomi, Realme, Samsung, OnePlus, and other phones.
Fixes for GPS problem in Android Phones (Xiaomi, Realme, Samsung, etc.)
- Restart GPS on your phone
- Enable Location Accuracy
- Turn off and on Aeroplane Mode
- Disable Power Saving mode
- Update Maps app
- Remove the Phone case
- Restart Android phone
- Update system
- Factory Reset
Procedures to resolve GPS problems on Android
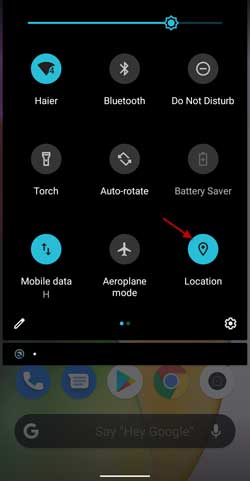
Restart GPS on your phone: In most times, restarting the GPS on your phone will fix the problem. To do that, swipe down the Quick Settings menu and tap on the GPS icon to turn off it. After a while, turn it on again.
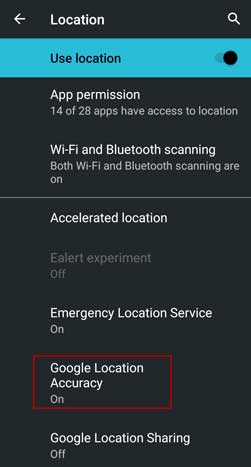
Enable Location Accuracy: Location service will improve location accuracy on your phone. It’s by using Wi-Fi, mobile networks, and sensors. To enable Location Accuracy on Android 10 devices, go to Settings > Location > Advanced > and turn on Google Location Accuracy.
Turn off and on Aeroplane Mode: In some cases, turning off and on Aeroplane mode will help you to fix the GPS problem on Android. It reset the network settings on the phone, and fixes the network-related issue.
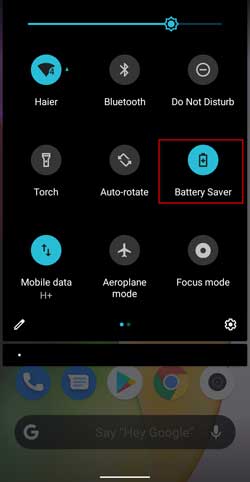
Disable Power saving mode: In Power saving mode, your Android phone will stop some functions and kill the background running process. It will affect GPS background running process for Google Maps. To disable Power Saving mode, pull down the Quick Settings menu and tap on the Battery Saver tile.
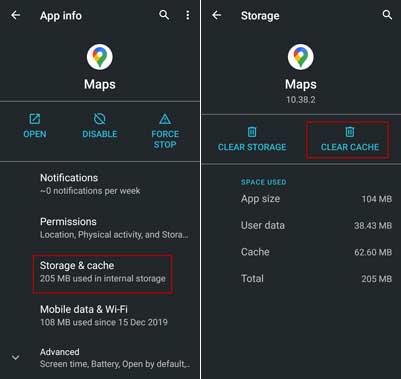
Update Maps app: Ensure that you are using the latest version of the Maps app. Also, delete accumulated cache of your application by going to Settings > Apps & notification > All apps > Maps > Storage & cache > Clear cache.
Remove the phone case: Your phone case can also cause for GPS problem. It can restrict the GPS satellite signal reception of the smartphone, so remove it and check whether the issue is fixed.
Restart Android phone: Most software related issues, including the GPS problem, would solve by restarting the phone. Long press on the Power button and tap on Restart.
Update system: Check for any software update for your phone by going to Settings > Advanced > System update. If the GPS problem is linked with a previous software update bug, the new update most probably will fix it.
Factory Reset: If any of the above-given methods doesn’t help you fix the GPS problem on your phone, try a factory reset as a last resort. To do so, go to Settings > Backup & reset > Factory reset. However, this will wipe your device completely, so backup important files before proceeding with the steps.
How to check if your phone receives GPS signal?
The above nine steps probably will help to fix the GPS problem in your Android phone. If you are still facing the issue, install the GNSSTest app from the Play Store and check that your phone receives GPS signals. Your phone won’t receive GPS signals if the GPS hardware has damage.


Comments (1)
The correct solution: Realme 8 Pro sets location to “not allowed” on all apps by default. You need to go in each app and change the permission to “allowed”.
Comments are closed.