Popular Domain Name System (DNS) servers, such as the OpenDNS, Google Public DNS, Cloudflare, etc., provide faster and more secure internet connections on computers and smartphones. You can use these free services to replace your ISP’s DNS server for better speed and security. And all these DNS servers support both IPv4 and IPv6 protocols.
Manually changing the DNS server on a Windows 11 PC is not as easy as many think. So, this article provides step-by-step instructions to change the DNS server on a Windows 11 PC. You can use IPv4 or iPv6, depending on your internet connection type.
If you do not know your connection type (IPv4/IPv 6), first use the Google service to find it. Enter this web page, and identify whether you’re on IPv4 or IPv6. Once you know the connection type, get your desired DNS servers, for example, Google Public DNS or Cloudflare 1111 DNS.
ALSO READ: How to quickly change DNS servers (IPv4, IPv6) on Windows 10
How to Change DNS Settings in Windows 11?
Change DNS Server for Wi-Fi Connection:
1. Open the Settings app on your Windows 11 PC (press Win+I keys).
2. Select the Network & Internet option from the left pane of the window.
3. Next, click on Wi-Fi and choose the Hardware properties option.
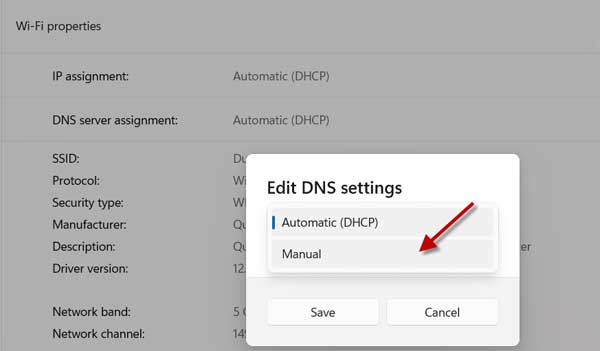
4. Now, click on the DNS Server Assignment edit button and select the Manual option from the dropdown menu.
5. Now, turn on IPv4 or IPv6 option as per your connection type.
6. Enter the DNS server address (for example, 1.1.1.1 for IPv4) under the Preferred DNS option and your alternate DNS server address (for example, 8.8.8.8 for IPv4) under Alternate DNS.

7. Next, click on the Save button and then close the settings tab.
You have now changed the DNS server for your Wi-Fi connection. Now, if you connect your PC to the internet via Ethernet, you can change DNS settings in the following way.
Change DNS Server for Ethernet Connection:
1. On Windows 11 PC, press the Windows + I keys to open Settings and select the Network & Internet option.
2. Now, choose Ethernet, scroll down, and click on the Edit button next to the DNS server assignment option.
3. Choose the Manual option from the dropdown menu.
4. Now, turn on IPv4 enter your DNS server address in the Preferred DNS column and the Alternate DNS column.
5. Finally, click on the Save button to save your settings.
That is all how to change DNS settings in Windows 11. You will now be able to browse the internet more securely and fastly.
More Resources:


