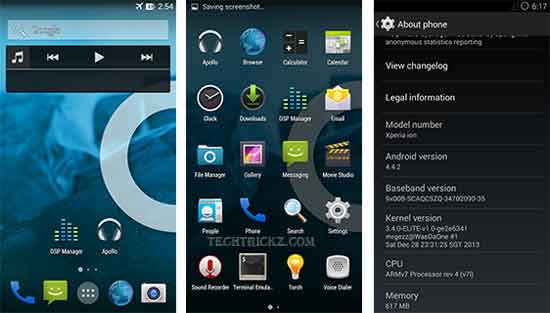
Chances for getting official Android 4.4 KitKat update for Sony Xperia Ion is very rare, but you can upgrade the device to 4.4.2 KitKat via unofficial Cyanogenmod 11 custom ROM (CM11 ROM) and enjoy all the features of the latest Android operating system. The unofficial CM11 custom ROM ported for Xpera Ion is almost fully functional; the only know bug is the LED indicator does not light up when charging.
Having good hardware specs, Sony Xperia Ion, which is currently running on Android 4.1.2 Jelly Bean, is capable of running the latest version of Android operating system KitKat. If you are interested, read below guide to know how to flash the custom ROM.
Disclaimer: This guide is for advanced users only. We can’t take responsibility for anything that goes wrong. As always, make sure you are fully backed up your device.
Important: Backup your contacts, SMS, and other data using apps like Titanium Backup. Also, make Nandroid back up via custom recovery.
Requirements:
1. Sony Xperia Ion rooted and bootloader unlocked
2. ADB and Fastboot Drivers installed on your PC
3. CM 11 Custom ROM for Sony Xperia Ion (Download from here)
4. Gapps (Download from here)
5. USB debugging mode enabled (Settings > Manage Applications > Development > USB Debugging)
6. Xperia Ion should be fully charged
ROM Installation Instruction for Beginners
1. On your computer, extract the downloaded CM 11 Custom ROM zip file and copy the “boot.img” and paste it into “fastboot folder” (e.g.: C:\ Android).
2. Now, connect your Sony Xperia Ion to your computer while holding Power-Up button to enter into “fastboot mode” (always use original USB cable to connect with your PC)
3. Now, go to the “fastboot folder” (C:\ Android), and open the ‘command prompt’ from there.
– To open command prompt, press and hold Shift key, then right click and choose “Open command window here” option.
4. In the command prompt window, type the following commands one-by-one.
fastboot flash boot boot.img
fastboot reboot
5. You have got “TWRP Recovery” installed on your device. Disconnect the phone from PC and turn it off.
6. Now, boot your device into the Recovery mode by pressing “Volume Up + Power” buttons together and from there, choose Recovery.
7. In TWRP Recovery, choose “Mount all” option and do “Factory Reset”.
8. Reboot your device.
9. Connect your device with computer using original USB cable and copy the CM11 ROM and GApps zip files in the root directory of your device.
10. Disconnect your device from PC and turn off it.
11. Once again boot your device into Recovery mode and choose “Mount all” option and do “Format System”.
12. Now, flash the “CM 11 Custom ROM for Sony Xperia Ion” followed by “Gapps”.
13. Once the process is completed, “reboot your device”. For the first time it’ll take 3 – 5 minutes to boot-up the device, so be patient.
Enjoy KitKat on Xperia Ion!
Note: As this ROM is in developing stage, you should be aware of the pitfalls associated with it. You may find stability is not up to scratch compared with the stock ROM, and in addition, some features of the device may not work correctly. However, things improve very quickly though at the early stages of development, so be prepared to flash the ROM regularly. [Source]


Comments (4)
after the 4th step
“4. In the command prompt window, type the following commands one-by-one.
fastboot flash boot boot.img
fastboot reboot”
my phone simply went blank what to do?
can you please post a video for instructions. Thanks
Awesome tutorial. Thanks.
As a Xperia Ion owner, I appreciate your work. Thanks for this simple guide.
Comments are closed.