Windows 11 has arrived with a quirky new taskbar layout, updated start menu, and many new features, which will make every PC user happy. But, Windows 11 requires two security settings in UEFI BIOS, TPM 2.0 and Secure Boot, for proper installation. It means many people will not be able to install Windows 11 on their old PCs. However, there are ways to bypass these compatibility checks when installing Windows 11.
Windows 11 ISO is now available for download for a clean installation of the latest OS. So if you want to install Windows 11 without TPM and Secure boot check, you need to create a bootable disk by disabling TPM, Secure Boot, and RAM requirements check. The latest version of Rufus (3.16 beta) lets you create a bootable Windows 11 USB drive.
Rufus is a handy tool to make a bootable USB drive. This portable application now supports Windows 11, and the latest beta version (3.16 Beta 2) lets you make bootable Windows 11 disk without TPM, Secure Boot, and RAM requirements.
Steps to Create Windows 11 Bootable Disk By Disabling TPM, Secure boot and Ram Requirement
1. Download the latest version of Rufus beta (3.16 or up) from the official website (link) to your PC.
2. Now, plug in a USB disk into your PC (requires a minimum of 8GB).
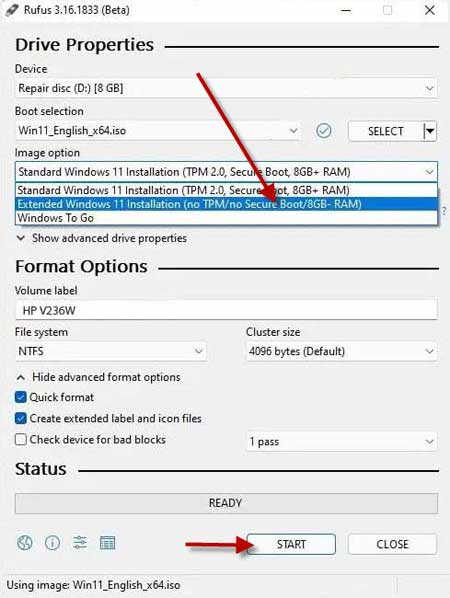
3. Run the Rufus beta .exe file (no installation is required) and select the USB disk.
4. Next, click on the Select dropdown button and choose the Windows 11 ISO file.
If you do not download the ISO file yet, refer to our guide to download it.
5. Now, click on the Image option dropdown menu and select the Extended Windows 11 Installation (no TPM, no Secure Boot, 8GB- RAM) option.
6. Next, leave all other options to the default and click on the Start button to start the process.
7. Wait until the process is complete, and you will get a bootable Windows 11 disk without TPM, Secure Boot, and RAM requirements.
So that is all about how to make a bootable disk bypassing TPM, Secure Boot, and RAM requirements. Keep in mind that installing Windows 11 on an unsupported PC may cause serious issues.
More Resources:
- Get Windows 11 Style Centrally Aligned Taskbar Icons on Windows 10 (Two Methods)
- Windows 11: Download Wallpapers
- Get Windows 10 Start Menu in Windows 11 (Two Methods)
- How to Change the Position and Size of the Taskbar in Windows 11
- Windows 11: How to Move Taskbar Icons to Left of the Screen


