Windows 11 preview build is available on all eligible PCs. One of the main attractions of this build is the new start menu, which opens in the centre of the screen when clicking the start button. Also, taskbar icons are now centrally aligned. And, there are no live tiles in the new start menu like on Windows 10, and it misses a few Windows 10 features.
While many people like the new centrally aligned start menu in Windows 11, some users dislike it. So, if you want to replace the start menu in Windows 11 with Windows 10 start menu, you can do it via a registry hack. Also, you can move the taskbar icons to the left in Windows 11.
Steps to Get Windows 10 Start Menu in Windows 11
1. Press Win + R keys to open the Run command box and type Regedit, and press Enter. It will open the Registry Editor.
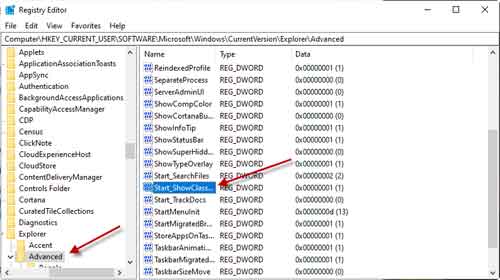
2. Now, navigate to HKEY_CURRENT_USER\Software\Microsoft\Windows\CurrentVersion\Explorer\Advanced
3. In the right pane, right-click and create a new DWORD value.
4. Name the new key as Start_ShowClassicMode.
5. Next, double-click on the new key and set the value 1.
6. Next, restart your Windows 11 PC, and your system will reboot with the old Windows 10 start menu.
That is all about switching back to classic Windows 10 start menu in Windows 11. Another change in Windows 11 is the centrally aligned taskbar icons. You can move icons to the left on Windows 11 Insider preview build. Here is how it is.
Steps to Move Taskbar Icons to the Left on Windows 11
1. Right-click on the Taskbar and select Taskbar Settings.
2. Next, scroll down and select the Taskbar Behaviours option.
3. Select the Taskbar alignment to ‘left’ in the drop-down menu.
You have now switch back to the classic Windows 10 start menu in Windows 11 and moved taskbar icons to the left on Windows 11. You can always revert the changes to default by removing the newly created Start_ShowClassicMode DWORD.
Use TenStartMenuFixer app to Restore Windows 10 Start Menu in Windows 11
If you aren’t comfortable editing the registry, here is a simple app called TenStartMenuFixer to get the Windows 10 start menu in Windows 11. It is a command-line app and easy to use. Download TenStartMenuFixer (link) and run the .exe file. A command prompt window will open with a few options. Press the number 1 key on your keyboard, and you will get a successful message in a few seconds.
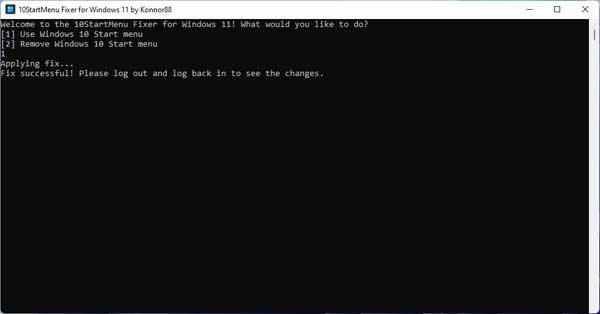
That’s it. You may need to log out of your system and sign back in for the change to take effect. You will still need to move taskbar icons to left manually. To get back to the normal Windows 11 start menu, run the app and press the number key 2.
More Resources:


