Microsoft’s new OS, Windows 11, is now available for download and installation. You can upgrade your Windows 10 PC to Windows 11 hassle-free via the Installation Assistant application. But if you want to install the new OS on a new PC or prefer a clean installation, you will need the full ISO file and create a bootable installation media. Here is how to directly download Windows 11 ISO file from Microsoft server without the Media creation tool.
Once you downloaded the Windows 11 ISO file, you can clean install the OS by creating a bootable USB disk. You can use Windows Disk Image Burner or other applications like Rufus to make a bootable disk. However, your PC should meet the minimum hardware requirements, such as a 64-bit, 1GHz or faster processor, a minimum of 4GB RAM, and 64GB or more storage space to install the Windows 11.
Steps to download Windows 11 ISO file
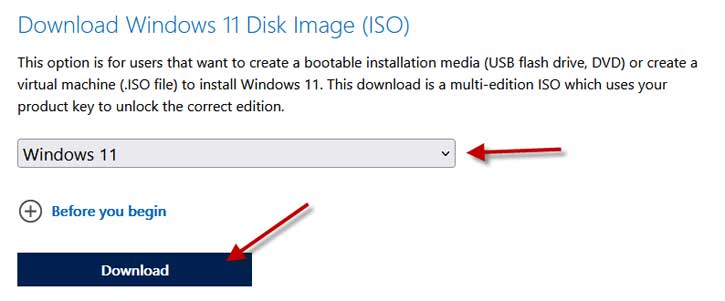
1. Go to Windows 11 download page (link), scroll down, and you will see Download Windows 11 Disk Image (ISO).
2. Click on the Select Download drop-down menu, choose Windows 11 and click on the Download button.
3. On the next page, you will need to select the product language.
4. After selecting the language, you will get the download option for 64 bit ISO of Windows 11.
Note that the ISO file will be around 5.1GB in size, and it will take some time to download based on your internet speed. And, the download link will be available only for 24 hours from creation, so if you prefer to download later, you will need to create the download link again.
How to create Windows 11 bootable USB disk?
You can use Rufus or Windows Disk Image Burner to make an installation media (bootable disk). To use Windows Disk Image Burner, follow the instruction below.
1. Go to the folder where you downloaded the Windows 11 ISO file.
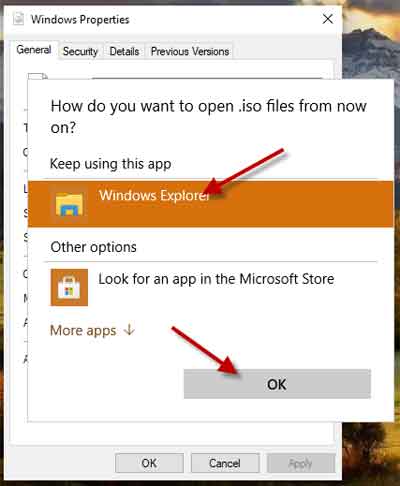
2. Right-click on the ISO file and select Properties.
3. Under the General tab, click on the Change button.
4. Next, select Windows Explorer and click OK.
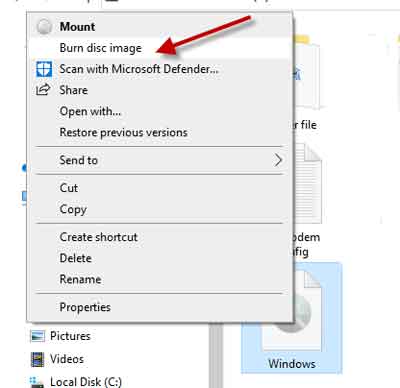
5. Now, right-click on the ISO file, and select the Burn disk image option from the context menu to create a bootable disk.
After completing the process, start to install Windows 11 from the bootable USB drive on your computer by following the installation wizard.
More Resources:


