Windows has a Network Discovery function that enables Windows 11 laptops to locate and discover other computers and devices on a network. This has been enhanced by Windows 11 compared to earlier Windows versions. Windows 11 has introduced plenty of features such as tablet mode, multiple desktop, customised Windows 11 style menus for chrome, enhanced network discovery, etc., compared to previous versions of windows.
Network discovery capability is enabled by default for private networks such as home or business. However, Microsoft has disabled it by default for public networks such as guest Wi-Fi and untrusted networks. So that other machines cannot automatically find your device.
ALSO READ: How to Reset Windows 11 Without Deleting Personal Files
You can use Network discovery to keep an eye on your connected networks or manage several connected networks in an organisation. This article will go over the ways you can turn on network discovery and also how Network discovery works.
Network Discovery Overview and Working
Network discovery is a built-in Windows function that allows PCs and other network devices to be discovered. When network discovery is enabled, the device sends out signals to hunt for other discoverable devices on the network. This makes it easier for you to share network resources among network-connected devices. Windows has three kinds of discovery states:
- On: In this condition, a Windows device will see and enable other connected devices to discover it on a network.
- Off: In this condition, a Windows device will not see or allow other connected devices to discover it on a network.
- Custom: Additional devices may see or discover a Windows device in this mode, although other Windows firewall settings are adjusted to fine-tune discoverability.
Network discovery searches the network for all accessible IP addresses. These IP addresses may be static, dynamic, reserved, or any other abandoned IP addresses that may be rearranged. Network discovery guarantees that each IP address assigned is legitimate and not being abused.
It also assists you in setting up your network in the most effective manner by displaying abandoned IP addresses that may be used for other reasons.
Use of Network Discovery
Network discovery is used to provide a unified network map that improves the visibility of network-connected devices. This functionality isn’t just for corporations with dozens of linked devices; it can also be used effectively by people for their home gadgets.
Because organisations have various devices linked to the same network, network discovery is useful for IT teams that must handle an influx of staff devices on a daily basis. It gives IT professionals more control over the network and keeps a lookout for devices with open ports.
The network discovery capability will largely assist any developing organisation. After all, staying on top of things and managing new gadgets that are introduced virtually every other day may be difficult.
Network discovery will keep track of new devices such as printers, routers, and other newly introduced devices.
4 Methods to Turn on Network Discovery in Windows 11
Turn on Network Discovery Using Control Panel
1. Open Control Panel from the Start or Search.
2. Click/tap on the Network and Internet icon in the Control Panel (icons view).
3. Click on Network and Sharing Center.
4. In Network and Sharing Center, click or touch the Change advanced sharing options link on the left side. (See the image below)

5. Expand and open the Private, Guest, or Public network profile for which you wish to enable or disable network discovery. (See image below)
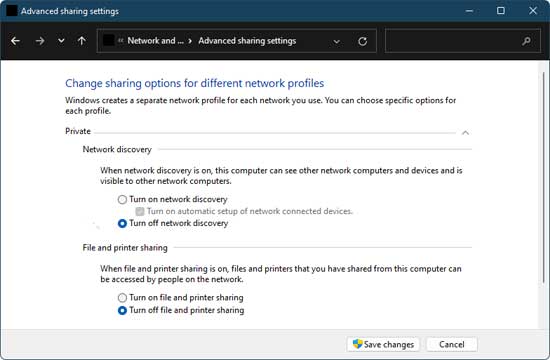
6. For what you want, choose Turn on network discovery or Turn off network discovery, and then click/tap Save adjustments.
Public Network discovery will be Off by default which is done for security purposes. If you are not on secured network, it is better to keep Public Network discovery Off.
Turn on Network Discovery Using Settings
1. Open the Settings menu from Start or Search. Or else you can use (Win+I) to open Settings.
2. On the left, click or tap Network & internet, and on the right, click or tap Advanced network options. (See the image below)

3. To open, click/tap on Private networks and/or Public networks.
4. On the right, click or tap Advanced sharing settings.
5. Select whether to enable or disable network discovery for private and public networks.
Please note that this is only available for those with Windows 11 Build 22509.1011 or later. If you are on any previous version or build, use the Control Panel method to turn on the Network Discovery.
Turn on Network Discovery Using Command Prompt
1. Open Windows Terminal (Admin), then choose between Windows PowerShell and Command Prompt.
2. Copy and paste the command below into Windows Terminal (Admin), then press Enter.
To Turn On the Network discovery, netsh advfirewall firewall set rule group="Network Discovery" new enable=Yes
To Turn Off the Network discovery, netsh advfirewall firewall set rule group="Network Discovery" new enable=No
3. If you choose, you may now close Windows Terminal (Admin).
Please note that in order to execute this command successfully, you have to run the Windows Command Prompt as an Admin. You can do this by right-clicking on Command Prompt and clicking on “Run as Administrator”.
Turn on Network Discovery using Powershell
Windows Powershell is the same as the Windows Command Prompt and you can use the same command to turn on or off the Network Discovery.
1. Open Windows Terminal (Admin), then choose Powershell (Run as Admin)
2. Copy and paste the command below into Windows Terminal (Admin), then press Enter.
To Turn On the Network discovery, netsh advfirewall firewall set rule group="Network Discovery" new enable=Yes
To Turn Off the Network discovery, netsh advfirewall firewall set rule group="Network Discovery" new enable=No
3. If you choose, you may now close Windows Terminal (Admin).
Please note that in order to execute this command successfully, you have to run the Windows Powershell as an Admin. You can do this by right-clicking on Powershell and clicking on “Run as Administrator”.
Conclusion
Network discovery is a valuable function that allows devices on the same network to discover and exchange information.
In a business context, network discovery enables system administrators to map their network architecture, easily locate devices, detect bottlenecks, resolve issues, and monitor them. I hope that this article has shown you how to turn on network discovery windows 11.
More Resources: