Solid State Drives (SSD) are an increasingly popular choice for millions looking for faster performance than conventional magnetic hard disks can provide. However, because SSDs are relatively expensive, many PC users choose a low-sized (256GB) SSD for their PC. But the problem is that apps, software, and media files are getting bigger and bigger as their quality and complexity increase. It means the PC soon runs out of space after installing a few apps and saving some media files.
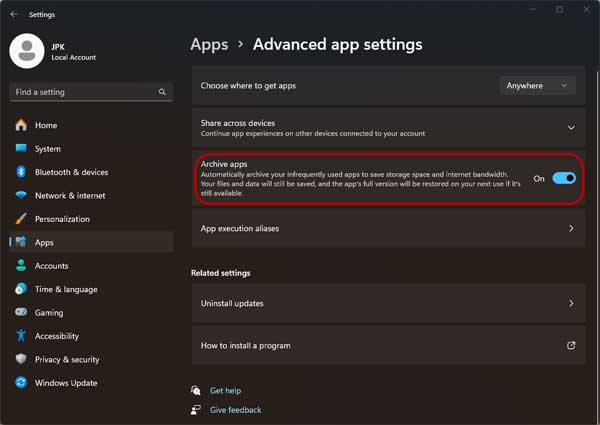
Microsoft has added the Archive apps feature in Windows 11 to handle the storage space issue. This feature automatically archives infrequently used apps to save storage space and internet bandwidth. Microsoft enabled this option on your Windows 11 computer by default, but it is worth checking whether it is disabled on your PC.
Windows 11 installs many apps on your computer, but many of these apps have no use for many people. You can uninstall many of them from your computer to gain storage space. However, insufficient storage is still an issue, especially if your PC has a low or mid-sized SSD. Enabling the auto archive rarely used apps feature can handle it.
ALSO READ: How to Auto Archive Unused Apps on Android Phone
Table of Contents
How to Auto Archive Apps Feature on Windows 11 to Save Storage Space?
1. First, open Start on your Windows 11 computer and click the Settings app to open it.
2. Next, choose the Apps option on the left sidebar.
3. Select Advanced Apps settings.
4. In Advanced Apps settings, enable the Archive Apps option if it is disabled.
What Will Happen to Your Apps When You Enable Auto Archive?
Though archived apps will be removed from your Windows 11 computer to save storage space, your data and files on the apps still be saved on your computer. If you open an archived app in future, it reinstalls immediately and retains your personal user data (if the app still be available).
Note that the above setting is only applicable to your current account from which it is configured. For other accounts, you have to log in that account first and then configure this setting apply.
Note: This article was first published in September 2023 and updated in June 2024 with additional information.
More Resources:
- Enable Storage Sense in Windows 11/10 to Clean up Unwanted Files Automatically
- How to Open Multiple File Explorer Windows From Taskbar in Windows 11
- Make Your Windows 11 PC Shutdown After Installing Updates
- How to Remove Personal Information (Metadata) From Photos and Documents in Windows 11
- How to Enable Clean Boot on Windows 11


