Windows always have built-in tools to clean up unwanted files (temporary files, recycling bin, and downloaded files), but you have to perform it manually. With Windows 11/10, Microsoft automated the process. The Storage Sense feature will delete unwanted files automatically and at specified time intervals.
Here is how to configure Storage Sense in Windows 11/10 to remove unwanted files automatically. This feature will auto remove unnecessary files, such as temporary files, content in the Recycle Bin, and unused files in the download folder. So you can always have more storage space and improved system performance.
By default, Storage Sense is disabled in Windows 11/10 PC, so you need to enable and configure it to empty unnecessary files automatically.
Steps to Enable Storage Sense on Windows 10
1. Open Settings (click Windows Key + I) and choose System Settings.
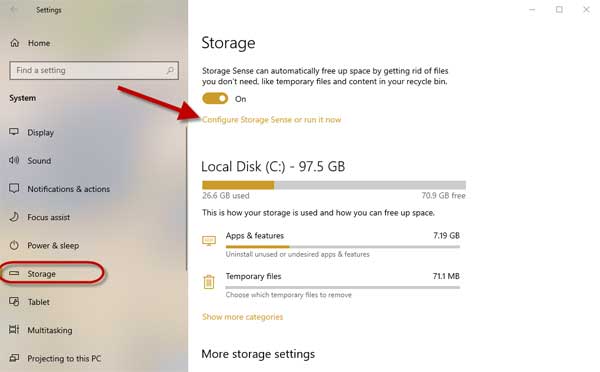
2. Next, select the Storage option in the left sidebar.
3. Now, on the right window, click on the Configure Storage Sense option.
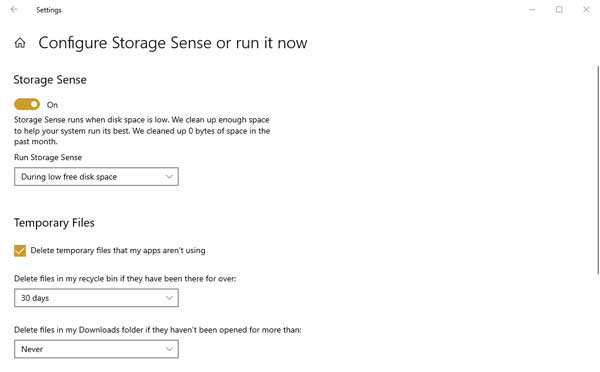
4. On the next page, enable the Storage Sense feature.
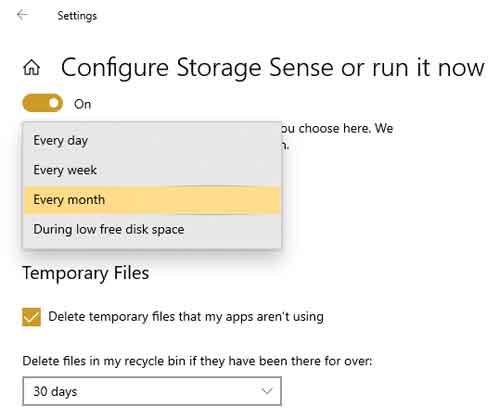
5. Next, click the drop-down menu and choose from the available period options – Every day, Every week, Every month, or During low free disk space.
6. Next, under the Temporary Files option, enable the Delete temporary files that my apps aren’t using, which will auto-delete files that are not using by any app.
7. Now, choose to delete contents from recycle bin automatically. Choose one day, 14 days, 30 days, 60 days, or Never options from the drop-down menu.
8. You can also choose to delete files from the downloaded folder if you are not using them. Choose one day, 14 days, 30 days, 60 days, or Never options from the drop-down menu.
Once configured, Windows will automatically empty files from Recycle Bin, download folder, and temporary files. That is how to use the Storage Sense feature to remove redundant files from Windows 10 PC.
How to Enable Storage Sense in Windows 11?
Storage Sense has been enhanced in Windows 11 and added a new option called Automatic User content cleanup. This new option lets you run Storage Sense automatically. Here is how to enable and configure the feature in Windows 11.
1. Click Win + I keys to open the Settings and select System.
2. Next, click on the Storage option and use the toggle to enable Storage Sense.
3. Turn on the Automatic User content cleanup option if you would like to run Storage Sense automatically.
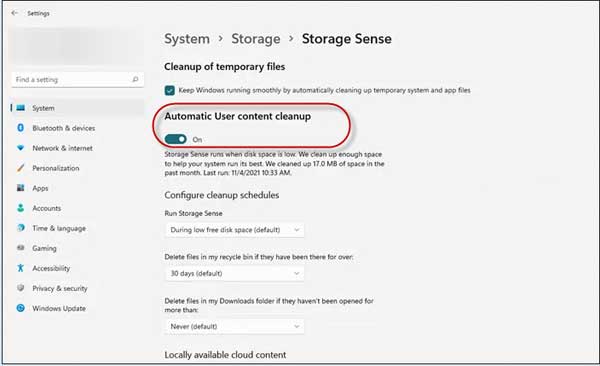
All other options, such as Cleanup of temporary files, Run Storage Sense, Delete files in my recycle bin if they have been there for over, etc., are identical to Windows 10, so configure them as per your requirements.
More Resources: