Systemless root is the most recent development by Chainfire. One of the main benefits of systemless root is that it is easier to unroot your device and apply OTA (over-the-air) update. Systemless Root method is now available for Moto G4/Moto G4 Plus. If you have enough reason to root your Moto G4/G4 Plus (XT1642/XT1622), then read on to know how it is.
In this guide, we show you how to root (systemless root) Moto G4/Moto G4 Plus without modifying the system partition. Thanks to XDA user Bender1987 for his systemless root method for Moto G4 and G4Plus. He utilizes Chainfire’s SuperSU 2.74-2 Beta version (a preferred rooting method for Android Marshmallow devices) for systemless root.

Before starting to root your Moto G4 and G4Plus, note that rooting your device is a great idea for unlocking tweaks that can help improve how it functions, but it is dangerous if you do not know exactly what you are doing.
Systemless Root Method for Moto G4/G4 Plus on Android 6.0 Marshmallow
Disclaimer: Follow the instruction at your own risk. We will not be liable if any damage occurs to your device and/or its components. It is recommended for technically talented users only.
Warning: This is an experimental method. Rooting your phone should do with extreme care; otherwise you will end-up with a bricked device. Backup whole data you have on your phone before proceeding with the below steps.
Prerequisites:
a) Unlocked Bootloader (detailed guide)
b) Minimal ADB & Fastboot driver (detailed guide)
c) TWRP custom recovery (download here)
d) BETA-SuperSU-v2.74-2 (download here)
Instruction:
1. Connect your phone to your computer via USB cable and boot into TWRP recovery by issuing the following commands:
adb reboot-bootloader
fastboot boot twrp-3.0.2-0-athene.img
2. In TWRP recovery, select Backup > select all Partitions (system, data, cache, boot) > Swipe to Backup all system. Save the back up on your computer.
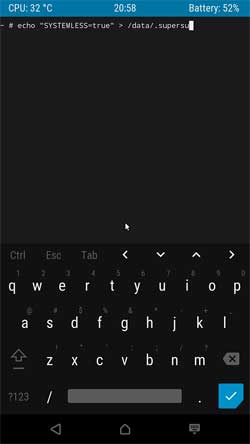
3. Now, write a ‘.supersu’ file for systemless rooting. To do so, go to TWRP > Advanced > Terminal > and type the below code:
echo "SYSTEMLESS=true" > /data/.supersu
4. Make sure the .supersu file is in /data (TWRP > Advanced > File Manager > /data)
5. Now, install SuperSU.zip. To do so, in TWRP recovery, select ‘Install’ and choose BETA-SuperSU-v2.74-2-20160519174328.zip. Swipe right to confirm flashing
6. Once done, reboot your Moto G4.
You can read more about this root method and discussion at the XDA thread [HERE]. If you come across any issue, leave it in the comment section below.


