We have now open public beta of Google’s new operating system, Android P. The new OS comes with noticeable visual changes, adaptive features and more. One of the new features of Android P Beta is DNS over TLS support. This new protocol protects user’s security and privacy by sending DNS queries over an encrypted connection. You can see the new Private DNS mode in Android P under the Network & Internet settings menu.
Android P’s Private DNS mode (DNS over TLS) allows users to add their own private DNS. Recently, Cloudflare (cloudflare-dns.com) has launched its own ‘privacy-first’ consumer DNS resolver, which supports DNS over TLS. Here is how to setup a private DNS on Android P and use Cloudflare’s 1.1.1.1 DNS.

Cloudflare claims that its DNS service is faster than the already popular OpenDNS and Google Public DNS. You can set up the new 1.1.1.1 DNS service on your Android, iOS, computer or Wi-Fi router itself. See this post for detailed instruction.
Since Cloudflare’s 1.1.1.1 supports DNS over TLS, you can make use of Android P’s Private DNS mode. Note that since DNS over TLS resolves IP from the hostname, you should use accordingly.
How to set up Android P’s Private DNS mode to use Cloudflare’s 1.1.1.1 DNS
1. Your device should be running on Android P.
2. Open Settings > Network & internet settings > Private DNS
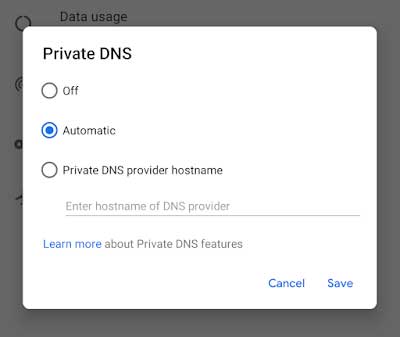
3. Now, you will need to enter hostname for Cloudflare to resolve 1.1.1.1.
4. Input the string: “1dot1dot1dot1.cloudflare-dns.com” and tap save.
Thanks to the Reddit user for this instruction. Let us know does this work with your Android P. (Source – Reddit)


