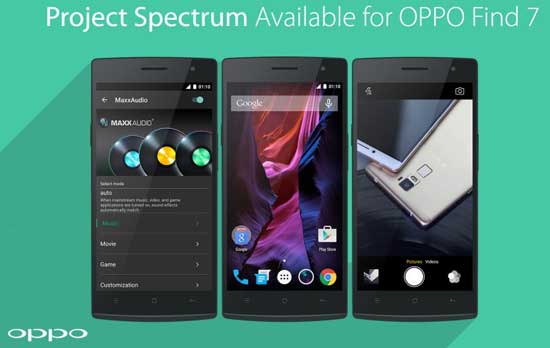
As announced earlier, Oppo has released the near stock Android OS called ‘Project Spectrum’ for Oppo Find 7 and Oppo Find 7a smartphones. Oppo’s smartphones are runs on a fully customized Android operating system called ColorOS, but for those who want pure vanilla Android experience on their Oppo smartphone, the ‘Project Spectrum’ is the answer.
In this guide, we will show you how to install Oppo’s near stock Android OS ‘Project Spectrum’ on Oppo Find 7 and Oppo Find 7a. Based on the Android 5.1.1 Lollipop, the ‘Project Spectrum’ brings near stock Android (ASOP) look and feel along with some of Opp’s most popular features (screen-off gestures) and apps (Camera, Maxx audio) to Oppo Find 7 Oppo Find 7a.
The current status of Oppo’s near stock Android OS is Beta, which means the firmware is unstable and you may come across issues while using the phone. Install the firmware at your own risk.
Note: The below procedure will wipe your data on your phone. Backup every data (use the Backup & restore app) before updating to the new OS, in case you want to go back to ColorOS.
How to Flash Oppo’s near stock Android OS on Oppo Find 7& Find 7a
Disclaimer: The process will wipe your phone. Backup any data on your phone before proceeding. Follow the guide at your own risk. We will not be responsible for any damage that occurs. The guide is intended for technically talented users only.
1. Download Oppo’s near stock OS (X9006&X9076_Spectrum_V1.0_Beta_full.zip) [HERE] and move it to your phone’s internal memory.
2. Now, boot your phone into ColorOS recovery mode. To do so, turn off the phone, hold down Power key + Volume down key at the same time. When the phone vibrates, release the keys.
3. In recovery, select the Language. (Oppo recovery supports touch operation, if your recovery is the old version that does not support touch operation, you can use Volume up/down keys to navigate and use Power key to confirm).
4. Now, select “Wipe data and cache”, press “Yes” when it is done.
5. In recovery, select “Install from sd”
6. Navigate and tap the stock Android OS (you have downloaded and saved on the phone) and press “Yes”.
7. When the flashing is finished, tap “Reboot” to finish updating.
Note that, the first boot will take little more time. Enjoy pure vanilla Android experience on your Oppo Find 7 and Find 7a (source – Oppo)


