Samsung has started rolling out the Lollipop firmware (build number N900XXUEBOB2) update to Galaxy Note 3 (SM-N900) in India. Users can update their Note 3 to Android 5 Lollipop through OTA (over-the-air) or Samsung Kies or flash via Odin. This tutorial show you how to install the official Android 5.0 Lollipop firmware update on Note 3 SM-N900.
The official Android 5.0 firmware N900XXUEBOB2 is destined for Galaxy Note 3 SM-N900 Exynos chipset variant and only for India. There is no news about the Snapdragon variant of the Note 3, but we will inform you when it is available. This firmware updates Note 3 SM-N900 to Android 5 and improves your device in many ways.

You will have a revamped Touchwiz interface that meets the Lollipop’s Material Design language, the new ART runtime brings an improved performance than the old Dalvik runtime, the battery life is expected to be improved much and overall you will have a buttery feel on your device.
Install Lollipop Firmware on Indian Galaxy Note 3 Note 3 SM-N900
The easiest method to install the firmware is via OTA. Just go to Settings -> About Phone and check for software updates. If the notification does not appear, the alternate simplest method is by using Samsung Kies. Install Kies, connect your phone to your PC and download the new firmware from your computer.
If Kies does not show the notification either, you can install the firmware using Odin tool. However, this method should try only if you are a technically talented user.
How to Flash Lollipop Firmware (N900XXUEBOB2) on Galaxy Note 3 SM-N900 via Odin
Note: This firmware is for SM-N900 Exynos variant of the Galaxy Note 3 and only for India. Installing it on other variants might brick your device.
Important: Make a full backup of your system and every data. Follow the instruction at your own risk. We will not be liable if any damage occurs to your device and/or its components. It is recommended for technically talented users only.
1. Download N900XXUEBOB2 firmware [HERE] [HERE] to your computer and unzip the file. You will need the file with .tar.md5 extension.
2, Download Odin3 v3.09 zip [HERE] file to your computer and unzip the content.
3. On your phone, enable “USB Debugging” from the Developer Options.
4. Make sure you have charged the battery to at least 80%.
5. Before starting with the flashing process, perform a full wipe and factory reset in the recovery.
Instruction to Flash the firmware
1. Turn the phone off your phone and boot into download mode by pressing and holding the Power, Home and Volume Down buttons simultaneously.
2. Now, connect your Galaxy Note 3 to the PC using original USB cable
3. Run Odin v3.09.exe file. You will get a blue sign in Odin, which means your device is identified. If not, install Samsung driver for your Note 3.
4. On Odin, make sure re-partition is NOT ticked
5. Click the PDA /AP button on Odin and select the firmware (the file with .tar.md5 extension)
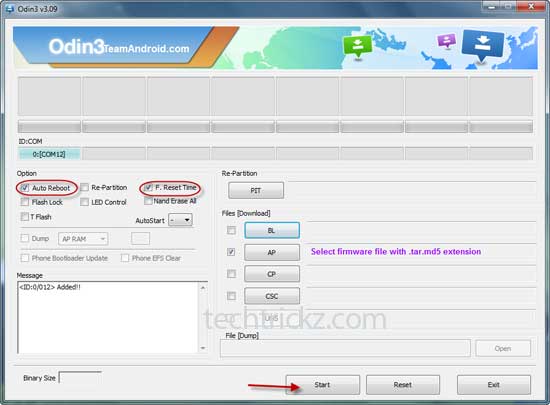
6. Click Start and wait for few minutes.
Once the installation is completed (you will get a Pass massage on Odin), disconnect the phone from PC, reboot and enjoy the all new Android 5.


