The AutoPlay function in Windows 11 allows media files to start playing via appropriate applications when inserting a removable drive or memory card. But this feature can also distribute malware via USB drives and memory cards by modifying the so-called Autorun. Inf file. So disabling or controlling the AutoPlay function in Windows 11 will be a good idea to protect the PC.
Microsoft has made significant changes to the AutoPlay function in Windows 11 to reduce the possible threats via USB devices, and the default setting is enough for personal PCs. But, in an office or workplace environment AutoPlay feature can be completely disabled or shut down to prevent a possible infection.
ALSO READ: How to repair apps in Windows 11 without data loss
How to Disable AutoPlay for USB Drives/Memory Cards in Windows 11?
1. Open the Settings app on Windows 11 using Win + I shortcut keys.
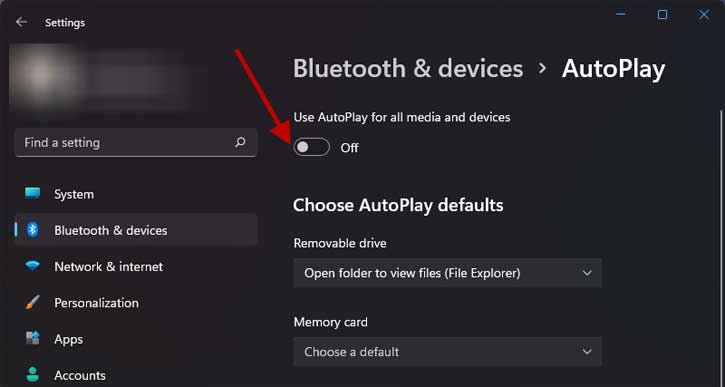
2. Next, select the Bluetooth & Device option and click on the AutoPlay option on the right pane.

3. Turn off the option Use AutoPlay for all media and devices.
4. It will disable the AutoPlay function of the removable devices and memory cards.
Below the above setting, you will have multiple options available for removable devices and memory cards to control the autoplay/autorun function. These options will depend on the apps you have installed on your computer.
How to Control AutoPlay Function in Windows 11?
1. Under Choose AutoPlay Defaults, click on the drop-down menu for removable drive.
2. Next, choose options like Take no action, Ask me every time, etc., as per your requirement.
3. Next, click on the drop-down menu for Memory cards.
4. Choose the Take no action, Ask me every time, or open folder to view files, etc.

How to Disable AutoPlay in Windows 11 using Control Panel?
The above AutoPlay settings are for removable devices and memory cards only. If you want to disable AutoPlay for CDs, DVDs, and Blu-ray discs, which are not common nowadays, you need to use the Control Panel option.
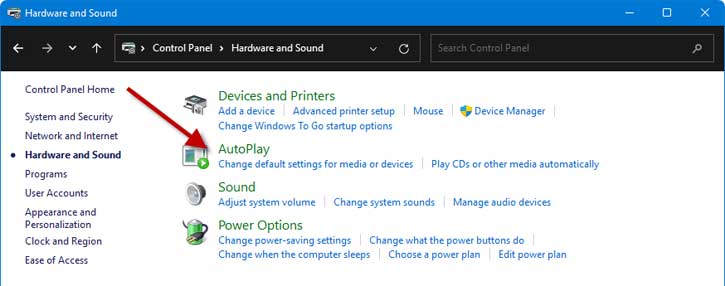
1. On Windows 11 PC, click on the Start menu button, type control panel, and click the Control Panel icon that appears in the results.
2. In Control Panel, select the Hardware & Sound option.
3. Next, click the AutoPlay option.
4. Uncheck the option Use AutoPlay for all media and devices to turn off or disable AutoPlay.
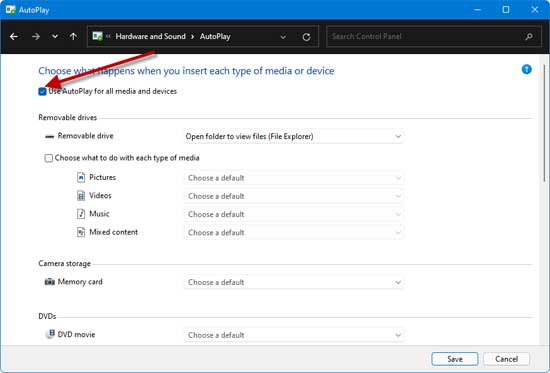
There are also options to configure each media device (CD, DVDs, Blue-ray disk, removable drive, memory card, and software programs) separately. Click the drop-down of each item and select Take no action, Ask me every time, or other suitable options. After making the changes, click the Save button.
That is how to disable and configure the AutoPlay function in Windows 11.
More Resources: