Whether it is a printer, webcam, smartphone, or graphics card, any device you connect to your computer requires you to install appropriate driver files to run the connected device correctly. But, if you have recently upgraded your hardware and installed new drivers, you should remove the old, unused drivers from your computer. It will ensure the smooth working of your computer and save storage space.
Old device drivers can cause hardware failures, conflicts, and system crashes on your Windows 11 computer. Old driver leftovers will clash with newer devices and prevent them from working. Here is how to remove old driver files from your Windows 11 PC without using any third-party app.
ALSO READ: Download, Install and Use Microsoft PC Manager on Windows 11
If you stop using a device, for example, a past printer, long-since replaced graphic card, USB drives, and other hardware, its driver files can stay behind on the PC. These old driver files can affect the working of the new device/hardware and consume storage space.
How to Remove Drivers Left Behind by Old Devices From Windows 11 PC?
1. First, open Command Prompt as administrator.
2. Now, type set devmgr_show_nonpresent_devices=1 in Comand Prompt window and hit Enter [you can copy and paste this command].
3. The above command will list all drivers for devices removed from your PC.
4. Next, open the Device Manager (use Windows search to get the Device Manager) on your computer.
5. In Device Manager, click the View menu and select the Show hidden devices option.
6. Now, click each device category in the Device Manager list, and look for entries with grayed-out icons.
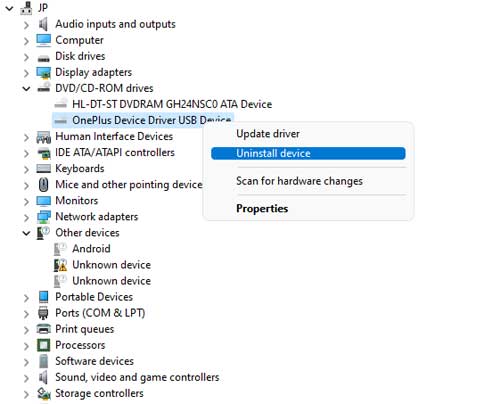
7. Right-click a device and click Uninstall to remove its drivers from your system.
Before uninstalling a device driver file, ensure that you selected the one that is no longer in use. That is all how to remove driver leftovers from your Windows 11 PC without any third-party software. It will help free up space and prevent potential conflicts on your computer.
More Resources:
- Reset Windows 11 Without Deleting Personal Files
- Disable Apps Installation on Windows 11
- How to Open Classic File Explorer With Ribbon UI in Windows 11
- How to Open Apps in Full Screen Mode on Windows 11


