The File Explorer in Windows 11 has a sleek design with a new command bar, new icons, and many improvements. The Preview Pane is a handy feature of File Explorer, which lets you see images, documents, and other files without opening them. But this feature is disabled by default in Windows 11.
This guide lets you know how to enable File Explorer Preview Pane in Windows 11. Also, learn how to fix the preview pane not showing images and other files issues. Preview Pane can be helpful if you want to handle many files and want to preview a file without opening it in its application.
ALSO READ: Disable USB drives/memory cards AutoPlay function in Windows 11
Table of Contents
How to Enable File Explorer Preview Pane Windows 11?
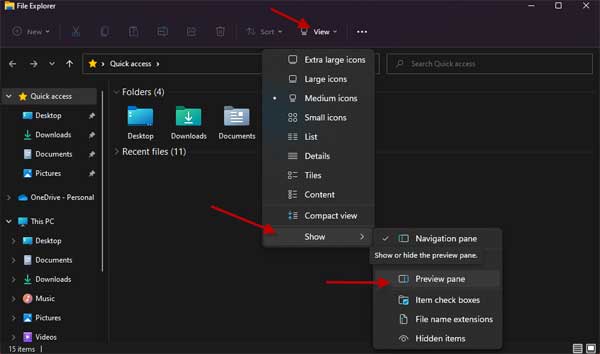
1. Open the File Explorer app (You can use Win + E shortcut key) on your Windows 11 PC.
2. In File Explorer, click on the View button and hover your mouse over the Show menu.
3. You will see several menus. Click on the Preview Pane menu to enable it.
You have now enabled Preview Pane in Windows 11 File Explorer. Now, when you select a file, for example, a document or an image file, it will display in the preview pane. However, if you can not see the preview of the file, check the following settings on your PC.
How to Fix Preview Pane not Showing Files?
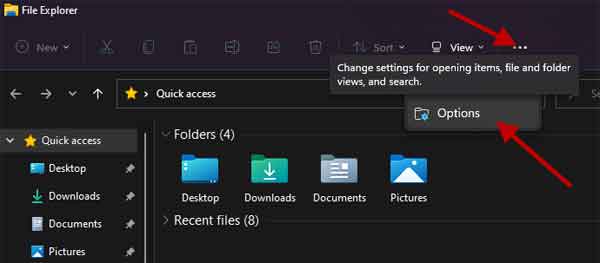
1. Open File Explorer in Windows 11 (use Win + E keys).
2. Now, click on the three horizontal dots menu, and select Options.
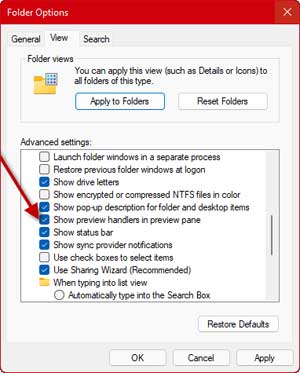
3. It will bring up the Folder Options window.
4. Select the View tab and check the Show Preview Handlers in the Preview Pane option. Enable it if not enabled.
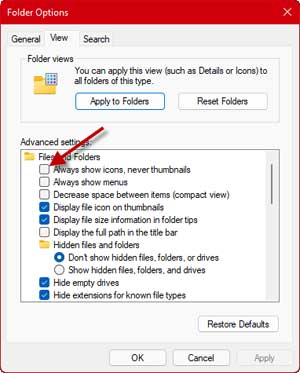
5. If images are not displaying in the Preview pane, disable the Always show icons and never thumbnail option.
The above settings will fix Preview Pane not showing the preview of files in Windows 11 File Explorer. If you are still facing the issue, click on the Restore Defaults option and click Apply button. It will reset the Folder option settings and fix the File Explorer-related problems in Windows 11.
More Resources:
- Enter Unicode Characters in Notepad Using Alt+X and Character Map Tool
- How to Enable All Apps by Default in Windows 11 Start Menu
- Fix a Sluggish Windows 11 PC by Making These Changes in the System
- How to Keep an App Window Always-on-Top in Windows 11


