Chainfire’s CF-Root is one of the easiest root methods, which is now available for several variants of Samsung Galaxy S5. The updated version now supports international and more carrier specific S5 models. If you are looking to root your Galaxy S5, for example, to remove some of Samsung’s bloatware apps or want to explore the limits of your S5, here is how to do it.

Chainfire’s CF-Auto-Root tool supports several Galaxy S5 variants. Before going to the root procedure, make sure you have a supported Galaxy S5 variant. The list is below. Please note that this root tool will install SuperSU (binary and APK) and stock recovery on your S5.
Supported S5 models:
- SM-G900F (International Qualcomm)
- SM-G900H (International Exynos)
- SM-G900I (Oceania)
- SM-G900M (Middle and South America)
- SM-G900R4 (US Cellular)
- SM-G900T (T-Mobile US)
- SM-G900P (Sprint)
- SM-G900T1 (Metro PCS)
- SM-G900W8 (Canada)
– Do not try this root method on any device other than the mentioned one above.
Warning: Rooting will increases your flash counter and trips the KNOX warranty flag! It means your device warranty will void.
Disclaimer: Please follow this guide at your own risk. We can’t take responsibility for anything that goes wrong. This guide is intended for technically talented users only
Instruction:
1. Download CF-Auto-Root tool from here. The zip file includes Odin v3.07.
2. Check your device model by going to Settings > About Device >Model Number.
3. Install the USB drivers for your device on your computer (For driver Install Samsung Kies).
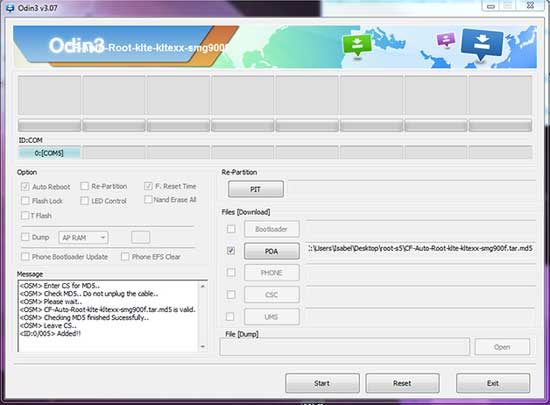
4. Open Odin, click on the PDA field and browse to the file CF-Auto-Root-klte-kltexx-smg900f.tar.md5 (the file name have slight different depending on the S5 model). DO NOT check the Re-partition box.

5. Boot your device into Download Mode. To do so, switch off phone, press and hold Volume Down and the Home button and then press Power. After getting a warning screen, press the Volume Up button.
6. Now, connect S5 to your PC via USB cable. Odin should recognize your S5. If not, check driver installation and USB cable.
7. Now, click Start. After some time S5 will restart and Odin will display a PASS message. You should now have SuperSU installed on your device. That’s it.
Note: To confirm you now have root access on your Galaxy S5, install Root Checker app from Play Store and check it. (source)


