How to Reinstall Official Firmware on Moto E
There are several reasons for you to reinstall official firmware on your Moto E. After rooting and installing few custom ROMs on your Moto E you might want to go back to its original stock firmware, or if you want to unroot your Moto E or if it stuck at boot loop after flashing a wrong ROM or whatever reasons your Moto E became unusable. The below guide lets you know how to reinstall official firmware back to Moto E.
This guide lets you flash official Android 4.4.2 KitKat firmware on your Indian edition Moto E. However, please note that this procedure will not remove Unlock bootloader warning at boot time. You need to do few things to solve the issue. If you do not like the “bootloader unlock” logo on your Moto E, please follow this guide.
Instruction for reinstalling stock firmware on Moto E
1. Install Motorola driver on your Windows PC. Download the driver from here.
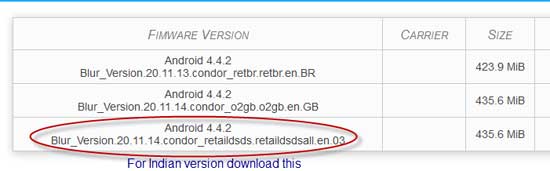
2. Download stock firmware from here. Download the correct firmware for your device. (For Indian version, download the third one)
3. After downloading the file, extract the xml.zip file to a folder on your computer. You can use 7zip for this purpose.
4. Download mfastboot from here. After downloading the mfastboot file, copy it to the directory where you have extracted the firmware files.
5. Now, restart your Moto E into bootloader mode. To do so, press Power button and Volume down key simultaneously few seconds and release both keys.
6. Now, connect your Moto E to your PC via USB cable.
7. Now, go to the firmware-extracted folder and in an empty space, Shift + Right click and choose “Open a command window here”.
8. Issue below commands one by one.
mfastboot flash partition gpt.bin
mfastboot flash motoboot motoboot.img
mfastboot flash logo logo.bin
mfastboot flash boot boot.img
mfastboot flash recovery recovery.img
mfastboot flash system system.img_sparsechunk.0
mfastboot flash system system.img_sparsechunk.1
mfastboot flash system system.img_sparsechunk.2
mfastboot flash modem NON-HLOS.bin
mfastboot erase modemst1
mfastboot erase modemst2
mfastboot flash fsg fsg.mbn
mfastboot erase cache
mfastboot erase userdata
Note: While issuing all the above commands, you should get the status “OKAY” message.
9. After flashing all the files successfully and clearing the data and cache, reboot your device by issuing below command:
mfastboot reboot
Now you have successfully flashed the stock ROM on your Moto E. Enjoy! (source)
Related Posts

Comments (48)
Comments are closed.
Flashing stock firmware may fix the bootloop issue, but first need to unlock the bootloader, which is a complicated proces. Inexperianced users should not do it.
what does it mean and what we have to do ??
If these are software issues, then a reinstalling the firmware should fix all these.
Hello sir, my moto e has not been playing any kind of audio and also the wireless services like bluetooth and wi-fi are not working. I can’t enable them. After about 2-3 seconds of enabling them, it disables itself. Also if I try to play any song in the audio player, it goes to the next track and son on. I’ve tried hard resetting the device but it didn’t work. What can I do to solve this issue?
Your device bootloader should be unlocked and USB debugging function should enabled to access your phone’s system internal. Also, fastboot driver for your device should be installed on the PC
need help from u .My Moto e xt1022 was fully dead i connected mobile to laptop for flash but Moto auto flasher says”waiting for device” i installed all software’s? fast boot,qifl,minimal etc no response is there all r need device connected i already connected my devices to laptop wat can i do for connect my device to laptop place give solutions sir?
Here is the link to correct mfastboot-v2.zip ….
drive.google.com/file/d/0B5jlU9JnLAZGbVU0UzJ3N3p4X2M/view
Thank you very much Sir! I downloaded mfastboot through Google search and then executed your given commands successfully…
Thank you once again!!!!
MY Moto E is completely dead.
I repaired it in a service center…They installed bootloader in it or rooted it,,i dont know.
now its dead..Pressing power button and vol down doesnt make a differnce.
what can i do?
Unlocked bootloader is a prerequisites for installing firmware on Moto E.
Dear Sir My moto e Mobile is not working it is restarting itself and screen not open. Only motoral symbol is showing . kindly suggest how can I install software in my phone
Regards
N.sudhakar
First, you need to unlock the bootloader by going to Motorola website, then proceed
Hello Sir
I am giving the command as you described but the bootloader screen shows that the device is locked Status code 0 and transfer mode : usb connected
It might be due to corrupt boot image and incompatible init.d scripts, may be flashed a wrong image. The above guide is for Android 4.4.2 version and not for 5.1 version
i followed your steps. it seems all correct. when i rebooted my device it is showing some error.
Error- failed to validate system image
Fastboot Reason: Fail-through from normal boot mode USB connected
i used XT1022_CONDOR_RETAILDSDS_5.1_LPCS23.13-34.8-3_cid7 firmware from the link you provided in your comment. please help me.
Install proper ADB driver (not USB driver) for your device. One of my posts gives a detailed guide on this.
Sir,My Moto E is Not being dedected by pc when i connect it via USB cable.
Please help..
I thought that I had explained it well. The guide is intended for technically talented users only. For 1st gen Moto E, you can find the firmware here (http://forum.xda-developers.com/showthread.php?t=2755857)
Can u explain clearly and plzz send me all download links
You may go to the xda thread at [http://forum.xda-developers.com/moto-e/development/flashable-zip-stock-deodexed-rom-moto-e-t2823368]. I cannot confirm that this is original, untouched rom. Flash at your own risk!
i am not getting the correct version of firmawares for my moto e i.e. blur_version.20.11.14.condor_retaildsds.retaildsdsall.en.03 all the related links are dead and am stuck with a bricked moto e xt1022. please help me with the proper valid link to download the file.
sir i really need ur help could u please tell me
what t do
i did all the above instructions n al were done scssflly but my phone still wont start nd i stuck on the m logo
i typed the firstline and all i got was not recognised as an internal or external command can you help
the firmware link is not working, please provide mirror link for indian version
Hi, in the command promt window after entering the 1st command its displaying waiting for device, pls suggest
firmware link is not working
getting error every time i open it
plz add another link
Cannot download there is error opening website please add new link its urgent
sir, can i use stock deodexed rom for flash my moto E
Sir, im not able to download the firmware in the given link. Error coming on the page.
My moto E has suddenly stopped working. Its not starting. Just the moto logo appeared and stopped. I tried hard reset but not worked. Plsa help.
I got the answer!!!
Everyone who is willing to restore and relock to stock 4.4.2 must know dat after updating to 4.4.4 the bootloader also got updated, so we can’t actually relock it since motorola did not released the stock 4.4.4 firmware for moto e!
so we are getting error results.
But, we can restore to stock firmware 4.4.2 if we don’t apply these lines(fastboot oem relock begin,fastboot flash partition gpt.bin i.e bootloader)
Note: This process requires unlocked bootloader.
My Moto E is 4.4.4 out of the box!!
Currently i m having a problem with the google play music.Whenever i try to play songs using it, it crashes everytime even after updating and factory reset.
so, i planned to revert to 4.2.2 but it’s not getting installed.I tried your process n of xda dev.but the system images are not getting installed.And some orhers.It flashes a message of unsinged image,etc. like that.
Can you help me up..??
try deleting cache partition and wipe data from recovery or reinstall the Parandroid ROM
Dear Sir,
I tried flashing Parandroid ROM on Motorola Moto E. The starting was good.After that, my battery was completely low.When i charged it, its stuck in that Parandroid logo.
Please help me!
I can not Download mfastboot from your given link ,please help me…
thanks a lot … really you saved MY 500 rs from retailer
Download correct firmware for your device and flash it
Wiping OS will not affect bootloader. Download correct firmware for your device from the link given in the article and flash it.
hey sir….GUD Evening…
SIr i’m in a disastrous situation….& needs ur help
– I have rooted my MOTO E & installed custom REcovery….but accidently Wiped my system OS…..now my MOTO E is completely blanked
– further i’m not able to load to bootlaoder…….plEASE HELP ME!!!!!!!!!
– i”m stuck on MOTOROLA’s WARNING PAGE OF BOOTLOADER UNLOCK
HOPE to hear from u at the EArliest!!!!!1
plzz save me!!!!!
Sir I read your article and do it by the way you write in the article and it was successfully done and when I open it ,it only shows a single Sim and that to it does not have a network sir please solve it
And it become a single sim
It’s working sir thanks a lot but it’s language has change
Sir,I rooted my moto e and goes to recovery mode and wipe all the data including android files by mistake now I reboot my device it goes blank please help me
Sir,
When i write partition gpt.bin it says preflash validation failed…
Also for the second one….
Else works correctly….
Please help
Very useful!! heartly thanks for your kind post.. it saved my life !
Explain your problem
its not working ,, i have moto e with 4.4.4 android version,, i tried to install 4.4.2 in phone,, its not working ,,help me how to install it..
It’s Working!!!!!!!
Thanks a lot, You saved my Valuable time and money.