Microsoft has released Windows 11 with many cosmetic changes and new features, and it is free. Centralized taskbar and start menu, snap layout, widgets, new setting app, new file explorer, etc., are some of the areas of improvement in Windows 11. However, if you do not like Windows 11, you can return to Windows 10. Here is how to do it.
As of this writing in October 2021, Microsoft is not forcing any Windows 10 users to upgrade to Windows 11. So if you want to go back to Windows 10, there are three ways to downgrade your PC to Windows 10 from Windows 11. You can use the Go back option, use the backup drive, or prefer a clean install. The first and second methods will retain your data, while the third option will wipe data from your computer.
Here is how to downgrade your PC back to Windows 10 from Windows 11. There are two main things to consider here. First, you should create a backup drive before upgrading to Windows 11. Second, you have got only ten days to use the Go back option after upgrading to return. And, the old Windows files that save on your PC while upgrading should be there.
Steps to Downgrade Windows 11 to Windows 10 via Recovery
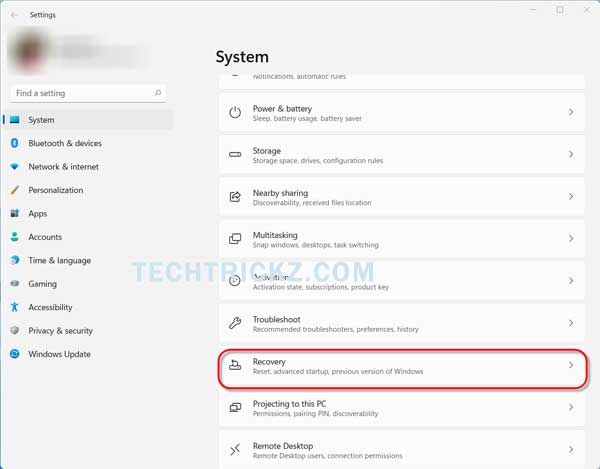
1. Open the Settings app on your Windows 11 PC.
2. In System settings, click on the Recovery option.
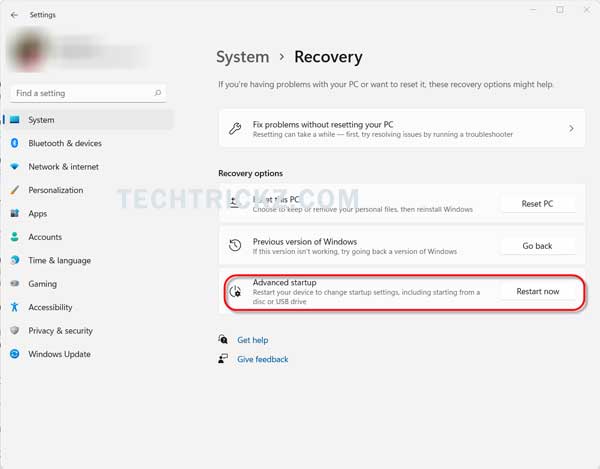
3. Next, click on the Go back button under the Go back to a previous version of Windows option.
4. Accept all warnings, and the reversal process will start
5. Once it finishes the process, you’ll be back on to your previous Windows 10 version.
The above method may not work for everyone. The recovery option may not be available after ten days of Windows 11 installation. Also, if you have removed the old windows file after installing Windows 11, the recovery method will not work.
Steps to Downgrade to Windows 10 via Backup drive
If you have created a system backup before upgrading to Windows 11, you can go back to Windows 10 at any time by restoring the backup image. Here is how to do it.
1. Connect your backup drive to your PC and start the PC.
2. You should see a blue screen of the discovery option.
3. Click on Troubleshoot option and then choose the Advanced option.
4. Next, select System Image Recovery to restore your Windows 10.
Steps to Downgrade From Windows 11 Via Clean Install
1. First, copy all the files you have on your PC to another drive.
2. Now, download the Media Creation Tool (link) to your PC and run the tool.
3. Connect a USB flash drive to your PC, which you want to make a bootable disk.
4. Next, choose the Create an installation media option, click Next, select your USB drive, and proceed with the step.
5. The tool will start downloading Windows 10 and flash it to the USB drive.
6. Now, go to Settings on your PC, select System, and click on Recovery. In Recovery, choose Advanced startup and click Restart now button.
7. Your PC will enter into boot options. Select the “Use a device option”, then choose the USB bootable disk.
8. You will enter into Windows 10 Installation window. Here, choose your preferred language and region settings, then click Install now.
9. Accept the Windows 10 license terms and in the next screen, select the Custom option.
10. In the next screen, select your disk partition, which you need to install Windows 10, and then proceed with the installation process.
Once the installation finishes, set up your Windows 10 again. So this is how to clean install Windows 10 on a PC running on Windows 11 preview build.
More Resources:


