Samsung’s latest smartphones, such as the Galaxy S10, Galaxy S20, etc. have all the currently available bands and frequencies (5G, 4G LTE, 3G, etc.). Usually, your phone will automatically select network bands to maintain a proper connection, but if you are in a signal congestion area, you will run into problems. Here’s how to enable network band selection on Samsung Galaxy Phones.
Samsung Galaxy phones, running on the latest One UI 2.0 firmware, have a hidden network band selection settings, which will show all the supported bands on your phone. You can use this hidden settings menu to lock your phone to a lesser-congested network band for reliable connectivity.
Here’s how to access the hidden band selection menu on your Samsung Galaxy Phone running on the One UI 2.0 or later, such as the Galaxy S10 or Galaxy S20, etc.
Table of Contents
How to Access hidden band settings menu and lock your Galaxy phone to a specific band
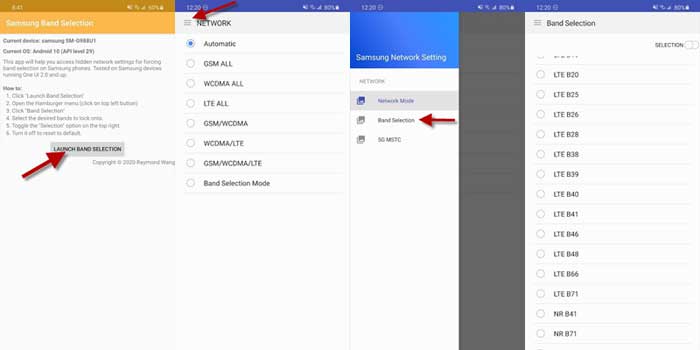
- Install the Samsung Band Selection app from the Play Store (link).
- Open the app and tap on the Launch Band Selection button.
- Open the Hamburger menu on the top left.
- Tap on the Band Selection and select the desired band to lock.
- Finally, tap on the Selection toggle to turn on.

You have now locked your Samsung Galaxy phone to a specific band of your choice. This setting will work with all carriers’ SIM cards and bring stable network connectivity, but it can cause reception problems in some areas. So, here’s how to reset the setting to default.
How to reset your band selection settings to default?
- Open the Samsung Band Selection app, and tap on the Launch Band Selection button.
- Tap on the Hamburger menu, and tap on the Band Selection option.
- Now, tap on the Selection toggle to turn off.
- It will reset the settings to default.
Note that you can also use the service code *#0011# on your Samsung Galaxy phone to see the band selection menu (more details). You can view exactly how many slices of that band are available (that is, 5×5, 10×10, 15×15, etc.). You can also use this information before switching to a new carrier.
More on Samsung Galaxy Phones
- Enable LTE Only Mode in Samsung Galaxy Phones
- Get Vertical Volume Slider on Samsung Galaxy Phones
- Samsung Galaxy Phone Vibrating for No Apparent Reason


