One of the new features in Android O is Navigation bar customization. You can add extra buttons and functions by changing the navigation bar layout to right, left or middle. You can add useful functions like volume up/down button, left and right cursor buttons and many more to the nav bar. In previous version of Android, it was only possible via root. In Android O, this feature is a part of System UI tuner and experimental. Check out the guide to know how to add new functions to nav bar.
In this tutorial, we show you how to customize nav bar in Android O Developer Preview. You can add new functions with icons to navigation bar. All you need to enable the hidden System UI Tuner, select Navigation bar from the list, add new icon to navigation bar and assign function to it. All are given in details in the below guide.
System UI Tuner, which was first introduced with Android Marshmallow, lets you edit some areas of the system – Status bar, Quick settings toggle, Navigation bar (Android O) , Lockscreen (Android O), DND (Android O). All these usually requires root access.
Note: System UI Tuner is hidden and experimental feature that you need to enable first to edit system settings.
How to Enable System UI Tuner in Android O
1. Pull down the Quick Settings menu. Press and hold the Settings cog in the top right corner for around 5 – 8 seconds and release.
2. Once you have released it, you should see a popup telling you that System UI Tuner has been added to your settings.
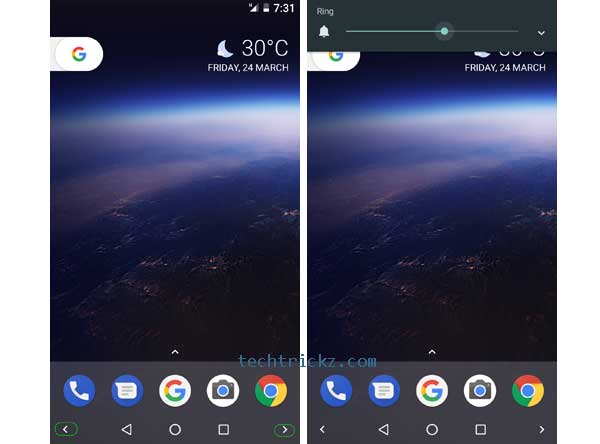
Note: In this guide, we let you how to add Volume Up and Down button on nav bar. However, you can add many other things on the nav bar.
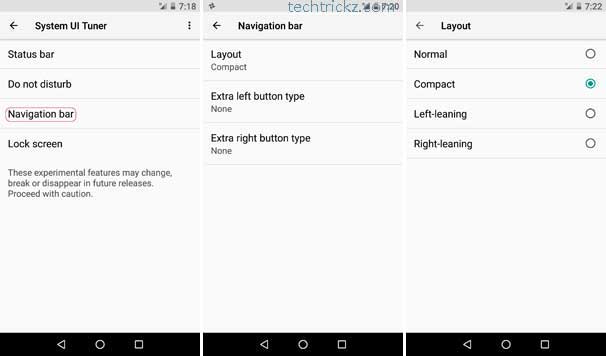
1. Open System UI Tuner by going to Settings > System > System UI Tuner
2. Tap on System UI Tuner and select Navigation bar.
3. In the next screen, tap on ‘Layout’ and then select ‘Compact’ (for instance) in the next screen.
4. Now, return to Navigation bar menu and tap on ‘Extra left button type’.
5. In the next screen, select ‘Keycode’.
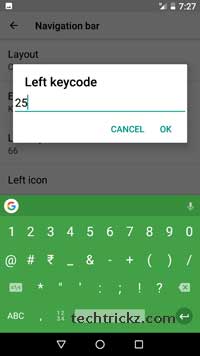
6. Now, you need to assign a keycode for this button. Tap on ‘Left keycode’, enter the value 25 (for volume down), and save it.
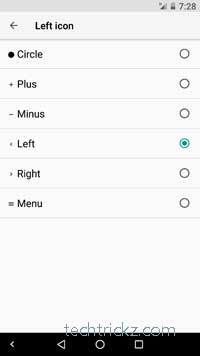
7. Now, tap on ‘Left icon’ and choose a desired icon. The selected icon will be displayed on the nav bar. That is it!
8. Now, you need to add Volume Up code and button to the right side of the nav bar. Do it in the same way by selecting appropriate options and enter the code 24 for volume up.
Note: Various keycodes are available for different purposes. Use this list from the Android Dev site to find the right codes, and add them.
For example, you can use keycode 208 for opening Calendar, 5 for Dialer, 209 for Play Music, etc. Find more at here. However, note that, many key codes did not see to work on our device. (Source – AP)

")

")