Samsung Galaxy S7 and S7 edge are not developer friendly devices. Since root access and TWRP custom recovery are the two main things for device development, employing these will trigger Samsung’s security protections (KNOX), which could potentially cause some warranty issues. If that does not bother you and have enough reasons to get root access and TWRP custom recovery on your Galaxy S7 and S7 edge, then simply follow the steps below.
The main benefits to rooting the Galaxy S7 and S7 edge are to strip off Samsung’s bloat apps, step away from Samsung’s heavy-handed UI, and boost battery life or change just about anything. While TWRP custom recovery enables you to flash ROMs, flashable zips files and perform full backups of your system.

Before get start, please note that the steps below are only for the Exynos variant (Exynos 8890 chipset) of the Galaxy S7 (G930F) and Galaxy S7 edge (G935F). It will not work on other variants and brick them.
Warning: Before you get start with rooting and custom recovery installation process, make a backup of your device’s data. Both will void your Galaxy S7/S7 edge’s warranty. Try this guide at your own risk! Also, this procedure will increase your flash counter and trips the KNOX warranty flag.
Install TWRP Custom Recovery and Root Galaxy S7 and S7 edge (Exynos Variants)
Disclaimer: This guide is for advanced users only. We will not take responsibility for anything that goes wrong.
Required Files to download:
a) Samsung drivers for Galaxy S7/S7 edge [HERE]
b) Download Odin3_v3.10.7.zip [HERE]
c) Download TWRP recovery .tar image for Galaxy S7 [HERE] (herolte) and Galaxy S7 Edge [HERE] (hero2lte).
d) CF-Auto-Root package for Galaxy S7 (G930F) [HERE] and Galaxy S7 edge (G935F) [HERE] [source]
TWRP Custom Recovery Installation Guide for Galaxy S7/S7 edge
1. Install Samsung driver on your computer.
2. Enable USB Debugging on your Galaxy S7/S7 edge. (Settings -> About -> tap 7 times on Build number to unlock Developer options. Now, again go to Settings -> Developer options -> enable USB Debugging.
3. Unzip the Odin zip file and then run the Odin.exe by double clicking.
4. Now, switch off Galaxy S7/S7 edge and then boot into Download mode. To do so, press Volume Down + Home + Power buttons together.
5. Connect the device to your PC via a USB cable. Odin should recognize your device. If not, install Samsung drivers and then try again.
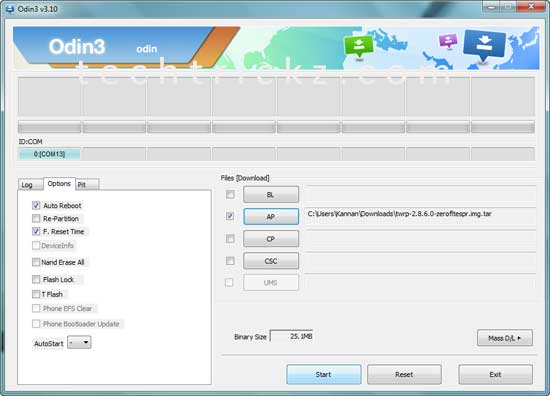
6. Now, on Odin, click the AP button and choose TWRP recovery file (twrp-3.0.0-0-herolte.img.tar) from your PC.
7. Click the Start button and wait for the process to complete. You will get the ‘Pass” message once process is completed.

TWRP custom recovery now installed successfully. Disconnect your phone from the computer, and reboot it.
Rooting Guide for Galaxy S7/S7edge
Here, we are using Chainfire’s popular CF-Auto-Root script for rooting Galaxy S7 or S7 edge. CF-Auto-Root package will install the SuperSU binary and APK, as well as the stock recovery on your phone.
1. Unzip the downloaded CF-Auto-Root file. You will get a file with a tar extension (not the img extension)
2. Run ODIN, click on PDA and select the “CF-Auto-Root…..tar.md5” file.
3. Switch off your Galaxy S7 or Galaxy S7 edge and boot into Download mode by pressing the Volume down + Home button.
4. Connect the phone to your PC. Odin should automatically detect your device.
5. After your device is detected, press the Start button and wait for ODIN to flash the CF-Auto-Root package. Once flashed successfully, ODIN will give you a ‘PASS’ message.
6. Once process is finished, leave your Galaxy S7 or S7 edge untouched for the next 5 minutes and let CF-Auto-Root do its job. During this process, your device will reboot multiple times. Even if nothing happens, just wait for 5 Min and then proceed to reboot your phone.

![[Guide] Realme 3 Pro Gets Official TWRP Recovery Support Realme-3-Pro](https://techtrickz.com/wp-content/uploads/2019/04/Realme-3-Pro-218x150.jpg)

