Xiaomi Mi LED smart bulb allows you to access millions of colors and temperature hues. You can find the shade and color you like best with the associated Mi Home app. In addition, you can remotely control the smart bulb with your favorite voice control platforms Amazon Alexa or Google Assistant. Here is how it is.
Xiaomi Mi LED Smart Bulb provides the right color for any mood. Users can adjust the brightness (80 – 800 Lumens) and color temperature (1700K – 6500K) of the bulb as per their needs remotely. You can control the brightness and color tone of Xiaomi Mi LED Smart Bulb with Amazon Alexa and Google Assistant.

If you are wondering how to connect your newly purchased Xiaomi Mi LED Smart Bulb to your Amazon Alexa or Google Assistant, here is how it is. All you need Xiaomi Home app, Amazon Alexa app or Google Assistant on your Android smartphone.
Once you finish the setup, you can control brightness, color tone and even schedule the switch on time of the bulb using your Android smartphone.
Table of Contents
Features of Xiaomi Mi LED smart bulb (model MJDP02YL)
The Mi LED Smart Bulb is capable of switching between 16 million colors. You can control the brightness and color temperature as per your mood and living space using Mi Home app. You can also schedule to turn on the bulb the moment you reached your home.
- 16 million colors
- 11 years long life
- Mobile app control
- 10W brightness with 800 lumens
- Adjustable color temperature from 1700K to 6500K
- E27 Base
- No bridge required, works with existing 2.4Ghz router set up
- Works with Alexa and Google Assistant
Requirements:
1. Install Mi Home app (download)
2. Install Amazon Alexa app (download)
3. Android 6.0 and above (for Google Assistant)
4. Connection between Mi LED Smart Bulb and Mi Home app
5. Wi-Fi connectivity
How to Connect Mi LED Smart Bulb to Google Assistant

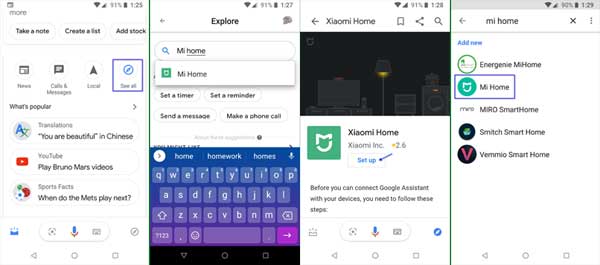
1. Open Google App on your phone and tap on ‘Updates’ at the bottom of the screen.
2. Scroll down and under ‘Explore using Assistant’, swipe left and tap on ‘See all’.
3. In the search bar type ‘Mi Home’ and from the search result, select ‘Mi Home’.
4. In Mi Home set up screen, tap on ‘Set up’ and then tap on ‘+’ symbol.
5. Again, search for ‘Mi Home’ and select it from the search result.
6. Enter your Mi account information. After successful login, you will redirect to Google Assistant.
7. Here, you will see all your devices connected to Mi Home app.
8. If you want to assign rooms for your connected devices, tap on the device name, select your room type from the list and tap on ‘Done’.
You have now successfully connected your Mi LED smart bulb with Google Assistant. You can control your bulb from the Assistant.
How to Connect Mi LED Smart Bulb to Amazon Alexa
1. Open Amazon Alexa app on your phone.
2. Go to ‘Skills and Games’ from the navigation slider and tap on ‘Search’ icon.
3. Search for ‘Mi Home’ and then select ‘Mi Home’ from the search result.
4. Tap on ‘Enable to Use’ and then sign in with your Mi Account credentials.
5. Now, go to ‘Set up device’.
6. If you want to set a group for your device, select ‘Choose Group’, else skip the option and then tap on ‘Done’.
You have now successfully connected your Mi LED smart bulb with Amazon Alexa. You can control your bulb (adjust color, brightness and schedule) using Alexa.
How to control Mi LED via Mi Home app
1. Download and install Mi Home app on your Android phone.
2. Open the app, go to Mi LED Smart Bulb > Flow > then tap on Pick color.
3. Choose your favorite color using the circle shown on your phone screen
4. To adjust brightness of the bulb, from White/Color/Flow tab swipe up to increase and swipe down to decrease the brightness.
5. For a perfect lighting atmosphere, go to Favorite tab and choose your option.


