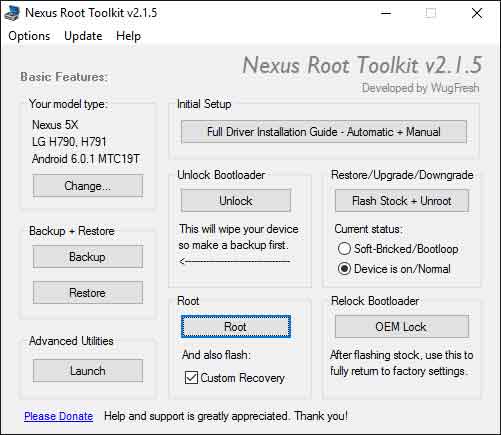
The Nexus Root Toolkit has updated to version 2.1.5 with bug fixes, code improvements and support for the latest Android N developer previews. Though not yet fully supports Android N (automated root support still in progress), Nexus Root Toolkit is the best application for rooting, unrooting, unlocking and relocking Nexus devices without the need of ADB and fastboot commands.
The Windows application Nexus Root Toolkit is not just a one-click root toolkit for Google Nexus devices. With it, tech-savvy owners of Nexus devices can flash firmware, flash zip files, set file permissions, generate logcats, and install custom recovery without the need of adb commands. It even downloads device drivers and factory images for Nexus devices.
Below are the full changelog of Nexus Root Toolkit v2.1.5
– Extended support to the latest Marshmallow builds.
– Partial support for the latest N preview builds (automated root support still in progress).
– Support for TWRP’s new file naming/versioning convention.
– Support for SuperSU’s new file naming/versioning convention.
– Elimination of the depreciated Koush superuser as an option.
– Extended the default wait time for adb recovery device detection and retry detection.
– General optimizations, code improvements and bugfixes.
The main advantage of WugFresh’s Nexus Root Toolkit is the array of its uses and simplicity. You do not need to use ADB commands to unlock/relock bootloader, install firmware, etc. It brings everything required to do all that.
Installation Instruction
Installing and using Nexus Root Toolkit is simple. Download [HERE] it and install on your computer. Conect your Nexus phone to your PC, run Nexus Root Toolkit and it will auto-detect your device and build.
If you have not proper driver for your device installed on the PC, the app lets you download and install it. Click the “Full Driver Installation Guide – Automatic + Manual” button to get start.
Once driver installation done, select your desired option (backup/restore firmware, unlock/relock bootloader, flash stock firmware/unroot, root, etc.) and follow the instruction. (Source)