OnePlus and Oppo phones has an option to increase the RAM, which helps users run multiple apps without lag. Called RAM Expansion, when enabled, it converts the phone’s storage space into virtual RAM. The phone will use this virtual RAM to improve the overall performance or when there is a need for extra memory.
RAM Expansion feature is available on phones running on OnePlus’s OxygenOS 12 and Oppo’s ColorOS 11 update. Currently, this feature is available in OnePlus 8 and 9 series phones and Oppo’s Find X and Reno series phones. This feature is also available on Samsung and Xiaomi phones, and the working of this feature is similar to the Windows Page File system.
Here is how to increase the RAM on OnePlus and Oppo phones with the help of the RAM Expansion feature. Ensure that your phone has more than 10GB of free storage space.
ALSO READ: How to fix Horizon Lighting not working issue in OnePlus phones
How to Increase RAM on OnePlus Phone?
1. Open Settings on your OnePlus phone and select the About Device option.
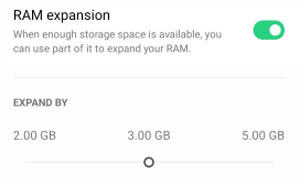
2. Choose the RAM option, and on the next page, you will see the RAM Expansion toggle.
3. Next, turn on the RAM Expansion toggle.
4. Select the 2GB, 3GB, or 5GB option, as per your requirement, and then restart your phone.
You have now enabled virtual RAM on your OnePlus phone. When running multiple apps or a large app, your phone will use this extra RAM to boost its performance.
How to Enable RAM Expansion in Oppo Phones?
1. Open the Settings app on your Oppo phone.
2. Scroll down, tap on the About Phone option and select RAM.
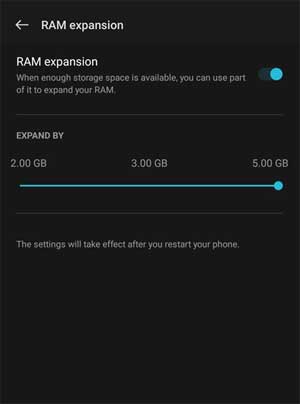
3. Next, toggle on the RAM Expansion option.
4. You will now get Expand By option with three options (2.00GB, 3.00GB, and 5.00GB, depending on the available storage).
5. Select the desired amount of virtual RAM and restart your Oppo phone.
So that is about how to increase RAM on OnePlus and Oppo phones. Since Virtual Memory uses storage space, the performance will depend on the storage available.
More Resources: