CloudFlare recently launched free 1.1.1.1 DNS service with greater privacy and faster internet speed. According to the company, its DNS service is faster than the already popular OpenDNS and Google Public DNS. Here is how to use CloudFlare DNS on your Android phone, so you can enjoy a more faster and secure internet on your Android phone.
There are three methods to use CloudFlare DNS servers on an Android phone. The first two method does not require root access on the phone. CloudFlare’s DNS (Domain Name System) uses 1.1.1.1 and 1.0.0.1 for IPv4 connections and 2606:4700:4700::1111 and 2606:4700:4700::1001 for IPv6 connections.
The first and simplest method to use CloudFlare DNS across your whole devices, including Android is changing DNS servers in router settings. Depending on your connection and router, the settings may vary.
First, login your Router settings using your router’s gateway IP address (for example, 192.168.1.1). After login, click on DNS and click ‘Set DNS manually’. Change the value for Pv4 to 1.1.1.1 (DNS 1) and 1.0.0.1 (DNS 2). For IPv6, change the value to 2606:4700:4700::1111 (DNS 1) and 2606:4700:4700::1001 (DNS 2)
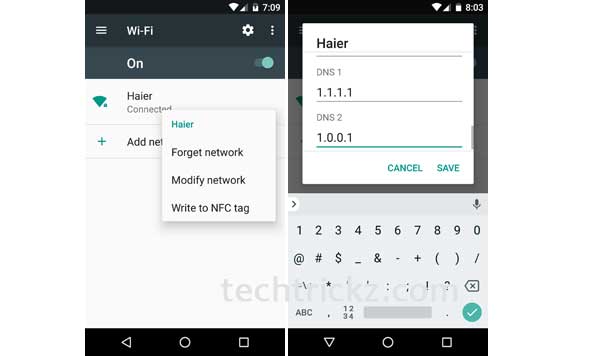
The second method is changing the DNS servers on Android phone itself, but you need to change IP settings from DHCP to Static. It may not work on every phone, but it is pretty simple.
– Enable Wi-Fi and open Wi-Fi settings, long press your router and select “Modify Network”
– Tap “Advanced Options”, scroll down and change IP settings from DHCP to Static.
– For DNS 1, set the value to 1.1.1.1 and for DNS 2 set the value to 1.0.0.1
– Save the settings and you are ready to use.

If the above method does not work for you, then you may try the third method given below. However, it requires a rooted phone with latest version Magisk (version 15 or above) manager installed on the phone.
The CloudFlareDNS4Magisk module for Magisk does the job automatically. This module forwards all mobile data via CloudFlare DNS servers, so you can get a faster and secure internet.
You can download the CloudFlareDNS4Magisk module zip file from here. Install the module through Magisk manager and then restart your device. That’s it.
For your information, Public DNS servers (Domain Name System) such as OpenDNS, Google Public DNS, CloudFlare DNS, etc. can be used as an alternative to your ISP’s DNS server for faster and secure internet surfing. In addition to being very faster than your ISPs DNS sever (most often), they offer many security layers to protect your PC from internet threats and prevent browsing bottleneck to speed up page loading. (Source – 1, 2)


![[Update] How to Fix ‘Can’t Connect to Messages for Web’ Issue Google-Messages logo](https://techtrickz.com/wp-content/uploads/2022/10/Google-Messages-218x150.jpg)
