
You may know what Hotspot Shield is. It is probably the most popular, free VPN service that secures and encrypts your online activities regardless of where you’re living. You can check your mail, update Twitter, check up on your friends at Facebook, or you can do anything online without being noticed by others and without letting know your exact location.
However, on some machines, you can’t connect Hotspot Shield because of some unknown reasons. Here is a simple solution by Patrick Soon which may solve the problem.
Update: If you can’t connect to the internet via Hotspot Shield VPN, or getting the message you may be connected to a network that requires authorization, first, signed in your computer as an administrator, and then check these settings on your device.
1. First, ensure that you are not using any other VPN service on your system, for example, the Opera VPN browser.
2. Make sure that your Firewall configuration does not prevent Hotspot Shield connection to the network.
3. Check that Tap-Windows Adapter V9 is installed on your computer and re-enable the adapter (Settings app > Network & Internet > Status > Change Adapter options > and right click Tap-Windows Adapter V9 to enable/disable the adapter)
4. If your device is connecting to a public Wi-Fi network, then use Google DNS or Cloudflare 1.1.1.1 DNS on your system.
5. On Windows 10 system, turn on the VPN for metered networks and VPN while roaming, and then check Hotspot Shield connection (Settings > Network & Internet > VPN).
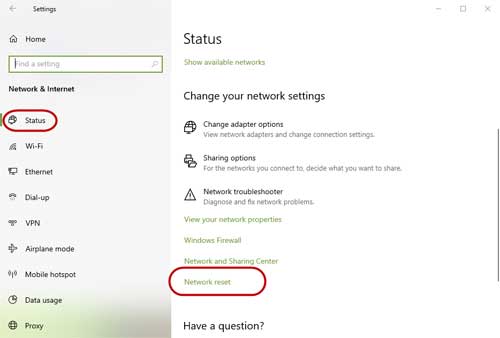
6. If you are still facing the problem, then try by resetting your network setting. For Windows 10, follow the below steps.
- Open Settings app > click on Network & Internet >Status
- Under Change your network settings, click on Network reset.
- Click Reset Now button to reset your network settings.
Original post:
- Install HotSpot Shield. After finishing the installation it will open the HotSpot Shield website in your browser. Copy this address from the Address bar of your browser and save it.
- If you get an error message stating that there is no connectivity, then follow as described below (for Windows XP).
- Go to: Control Panel – Network Connection – Local Area Connection – Properties
- In the General Tab un-check the box against Hotspot Shield Helper Driver and click Ok to save it.

- Close and reopen your web browser and copy and paste the address you previously saved in the address bar of your browser. Then press the refresh icon.
- The Hotspot Shield Website will now open and assign you an I.P address i.e. it will connect you. It should now work normally as before (via).
Hope that the above steps will fix your Hotspot Shield VPN connection issue on your system. If you have come across any other solution for the issue, then let me know it.


Comments (19)
So I had this problem for ages where hotspot shield was connected but in reality my ip had not changed at all. I finally realised what the problem was (with no help from their service. They literally gave me generic answers one can find on the website.).
Go to your account on hotspotshield and make sure your device is registered/connected. I had just bought a new laptop and hadn’t deleted my old laptop as a device. After that my problems were solved and everything worked again!
i have windows 8 and the above info that you post, Local Area connection have no such option, Hotspot option please guide me what to do?
thanks
Buy the full version!! Its a no brainer!!!
i dont have a hotspot shield helper driver…..and i use wifi….how do i fix it?? pls help
I have windows 10, i was using HOTSPOT SHIELD ELITE from last 15 days suddenly last night it stop working.when ever i run hotspot shield it just show me connecting all the time and after 10 min Error appears that is
“” You may be on a network that requires authorization. Please authorize the connection, then click reconnect. “”
i’m using cracked version of hotspot shield. if any one know how to solver this problem.
can u plz tell me what will i do on getting error 800 in vpn conectionn
In Windows 7 and 8, go to Control panel, click Network and Sharing center – local area connection -property
No such thing as ‘local area connection’ in my control panel. Don’t know what to do…
I use HS. it’s good but i don’t know when i open fb it works too slow or it doesn’t work!!!???
Plz guide me to solve this problem!!!
Hi Kannan, In my PC, the Hot Shield works even after one month. It is NOT paid version. It is very very slow, about 1/10 th of normal speed when using IE directly! Another difficulty is that the Realplayer downloader does NOT download anything (download progress bar will be blank), though the same downloader works normally on IE or Chrome (unprotected state). Pls offer any solution if possible. Thank you,
i’ve tried to install it but and error message with button abort,retry and cancel is popping out…is there a problem with my laptop?
Just use browser reload button or just press Enter key.
this website step 5 doesn’t show me where to refresh the icon
tanx good solution .
I m afraid it still does not work….I get the following message:
To turn Hotspot Shield ON:
Click on the shield icon in the icon tray
and select “Connect/On”.
When I try this process…..all it does is open a blank browser page…..
Please help me.
Thanks.
Sharat Saxena
have had 3 problems with the hotspot shield…….1. I cannot log into my Yahoo Msger 2. I cannot get my emails from my domain name 3. I cannot log into Comcast caller ID for my PC…….as soon as I turn it off ( which is a pain) Everything starts working again…….please help!
i donno what’s wrong with it…. it doesn’t work
i have windows vista and it was working very well
but it stopped 🙁
thx solution worked 4 me
Nice tutorial, will try to implement it on my PC
Comments are closed.