Google Nexus 5 is now available for purchase on the Play Store. It features a quad-core 2.3 GHz Snapdragon 800 processor, packs 2 GHz of RAM, 5? 1080p (445 ppi) IPS LCD panel, brand new OS Android 4.4 KitKat and available at a very affordable price.

If you own the Google Nexus 5 and want to connect it with your PC, you need to install proper driver (ADB and Fastboot drivers) for your PC. If you are a new Android phone user, and don’t know how to install ADB and Fastboot drivers for your Nexus 5, here is where to download driver for Nexus 5 and how to install it on your Windows computer.
Installing ADB Driver For Nexus 5
1. Enable USB Debugging mode: Go to Settings – About phone – Tap on Build number 7 times to get “Developer options”. Now go back to Settings – Developer options – Enable USB debugging.
2. Download the latest Google USB Driver for Nexus 5 from here. Extract it on your PC.
3. Connect Nexus 5 to your PC with provided USB cable.
4. On your PC, open the Device Manager: Go to Control Panel – Open “Device Manager”.
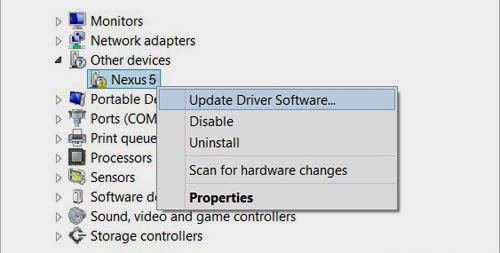
5. In the Device manager, you will see the Nexus 5 listed on the “Other Device” with a yellow exclamation mark.
6. Right Click on the Nexus 5 – Select Update Driver Software – Then click on the “Browse my computer for driver software”.

7. Now, click on the “Browse” button and select the Google USB Driver folder that you extracted on Step 2. Click next to start the driver installation.
Installing Fastboot Drivers for Nexus 5
– Switch off your phone and boot it in Fastboot mode by pressing and holding Volume Up + Volume Down and then pressing the Power button.
– Connect your phone to your PC. Your PC will automatically recognize and install the right drivers for fastboot.
That’s all! The driver installation completes.


![[U]Coolmuster Android SMS + Contacts Recovery App (Giveaway) Coolmuster Android SMS + Contacts Recovery](https://techtrickz.com/wp-content/uploads/2025/05/Coolmuster-Android-SMS-Contacts-Recovery-218x150.webp)