Samsung Galaxy S6 is an awesome smartphone with many features, but if you want to add new features, enhance performance, try out custom ROMs like CyanogenMod, customize with Xposed Framework or install certain apps, you need to have root access and custom recovery like TWRP or CWM on Galaxy S6; however, you will lose manufacturer’s warranty.
In this tutorial, we show you how to install TWRP custom recovery and root Galaxy S6 (all variants). Root access will enable you to modify more aspects of your Galaxy S6. You can remove bloat apps and change just about anything on it, but at the cost of manufacturer’s warranty.
Now, if you would like to get all the benefits of rooting and advantages of custom recovery on your Galaxy S6, read on to the instruction given below to know how to install custom recovery (TWRP) and get root access on it.
This root method and TWRP recovery supports all variants of Samsung Galaxy S6 – SM-G920F (International), SM-G920I (US, South America, Australia, India, etc.), SM-G920T (T-Mobile), SM-G920P (Sprint), SM-G920R4 (US Cellular), SM-G920W8, SM-G920W8 (Canada) , the Chinese models including Dual-SIM variant SM-G9209, SM-G9208, SM-G9208 (China), and SM-G920S, SM-G920L, SM-G920L (Korea).
Important: ONLY proceed if your device model is listed here. Do NOT install below mentioned TWRP recovery on Verizon and AT&T Galaxy S6, as these come with locked bootloader.
Warning: Rooting will void your Galaxy S6’s warranty. Try this guide at your own risk! Also, this procedure will increase your flash counter and trips the KNOX warranty flag.
Contents
How to install TWRP recovery and Root Galaxy S6
Required Files to download:
a) Samsung drivers for Galaxy S6 [HERE]
b) Download Odin3_v3.10.6.zip [HERE] or [HERE]
c) Download the SuperSU-v2.xx.zip [HERE]
d) Download TWRP recovery [HERE] and Sprint users [HERE].
How to Install TWRP Recovery on Galaxy S6
1. Install Samsung driver on your computer.
2. Enable USB Debugging on your Galaxy S6. (Settings -> About -> tap 7 times on Build number to unlock Developer options. Now, again go to Settings -> Developer options -> enable USB Debugging.
3. Unzip the Odin zip file and then run the Odin.exe by double clicking.
4. Now, switch off Galaxy S6 and then boot into Download mode. To do so, press Volume Down + Home + Power buttons together.
5. Connect your Galaxy S6 to your PC via a USB cable. Odin should recognize your device. If not, install Samsung drivers and then try again.
6. Now, on Odin, click the AP button and choose TWRP recovery file (twrp-2.8.6.0-zerofxxx.img.tar) from your PC.
7. Click the Start button and wait for the process to complete. You will get the ‘Pass” message once process is completed.
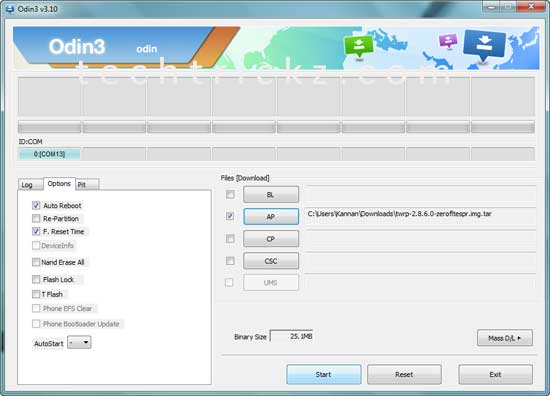
TWRP custom recovery now installed successfully. Disconnect your Galaxy S6 from the computer, and reboot it.
How to Root Galaxy S6
1. Save the downloaded SuperSU zip file to the root of your SD card.
2. Then, power off your Galaxy S6 and then boot into TWRP recovery. To do so, press and hold Home + Power + Volume Up together.
3. In TWRP recovery, tap the “install’ option from the main menu.
4. Choose the SuperSU zip file you have transferred earlier and let the process done by swiping the slider button.
5. Once the process is completed, go back to the main recovery menu and select reboot -> system and your Galaxy S6 will reboot with root access.
You have now successfully rooted your Galaxy S6. Any question? Leave it in the comment section below.


")
 Receives Official TWRP [How to Install TWRP Without Error]")
 Received Official TWRP Support [Installation Guide]")
If you have to boot into TWRP immediately after installing it, it sounds like the SuperSU file should already be copied to the root of the SD card on the phone before doing the first step.
Move it on your internal memory via MTP and flash it.
How are you supposed to save the supersu to the root of the sd card when the galaxy s6 has no sd card support? I’ve done everything else that I can but this step isn’t possible
The best fix for this issue is flashing stock ROM
My phone is stuck i bootloop after flasing twrp. I can not reboot phone at all. Please help! SM-G920W8 Fido
After flashing TWRP image, manually reboot into TWRP recovery (use Volume Up, Home and Power buttons). Note that, reboot into recovery immediately after installing the TWRP recovery. Otherwise the TWRP recovery will be overwritten and the device will reboot.
I downloaded the TWRP recovery correctly, but when I boot into recovery mode it opens the default android recovery instead of TWRP. Do you know how to fix this?
Place the SuperSU file on the root of SD card, not in any folder.
What folder is the Root of my SD Card located in? I don’t want to go messing anything up because there’s lots of folders on here.