Samsung Galaxy Note 3 will get the Android 5 Lollipop OTA update in coming months, but the exact time is unclear. However, the leaked Lollipop firmware for Galaxy Note 3 SM-N9005 verifies that users need not to be waiting too long for the update to arrive. The leaked Lollipop firmware (build N9005XXUGBNL8) will bring Android 5.0 Lollipop to Note 3 SM-N9005.
In this tutorial, we will show you how to update Galaxy Note 3 SM-N9005 to Android 5.0 Lollipop. This leaked firmware weighs 1.1 GB and upgrade Galaxy Note 3 to Android 5.0. The update is compatible with both the 16GB and 32GB variants of Note 3 SM-N9005, but the 32GB variant needs to be re-partitioned as per the new update.
Before you get start flashing the firmware, note that this Lollipop update improves Note 3 in many ways. Besides the revamped Touchwiz interface that matches the Lollipop’s Material Design language, the new ART runtime brings an improved performance than the old Dalvik runtime. Also, the battery life is expected to be improved much.
Install Official Android 5 Lollipop on Galaxy Note 3 SM-N9005
WARNING: This guide is intended for Galaxy Note 3 SM-N9005. Do NOT try it on other variants. Doing so will brick your device. Follow the instruction at your own risk. We will not be liable if any damage occurs to your device and/or its components. It is recommended for technically talented users only.
Prerequisites:
a) Note 3 should require at least 70% battery charge
b) Enable USB Debugging (Settings-> Developer Options -> USB Debugging)
c) Install required USB drivers for Note 3 on your Windows PC
d) Backup any data
e) Download [HERE] Lollipop Firmware (N9005XXUGBNL8 5.0.7z)
f) Download [HERE] Odin 3.09
Installation Instruction
1. Extract the downloaded firmware zip file and Odin zip file on your computer.
2. Run Odin v3.09.exe file
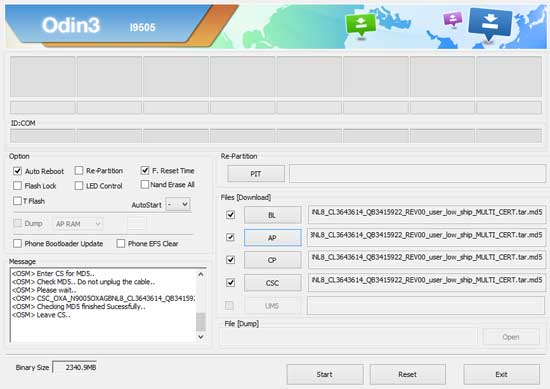
3. For 16 GB variants of the Note 3, make sure Auto Reboot and F. Reset Time are checked and everything else is unchecked in the Odin. Then select firmware files in their respective fields (see screenshot)

4. For 32 GB version of Note 3, follow the below steps carefully.
– Backup the PIT file of the device before flashing the firmware just in case something goes wrong. For this, open Command Prompt and execute the following adb commands one by one:
adb shell su -c "dd if=/dev/block/mmcblk0 of=/sdcard/My-N9005.pit bs=1 skip=17408 count=4244"

adb pull /sdcard/My-N9005.pit
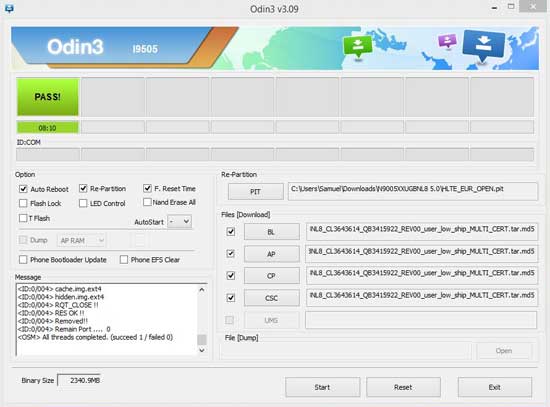
– Make sure Auto Reboot, Re-Partition and F. Reset Time are checked and everything else is unchecked in the Odin.
– Now, select the PIT file in the PIT field to re-partition your device. Then select firmware files in their respective fields (see screenshot)

5. Now, boot your Note 3 into download mode. To do so, switch off your phone and press Volume Down, Home and Power buttons together until you see the warning screen, use the power button to confirm and enter Download Mode.
6. Connect Note 3 to the PC using an USB cable.
7. Odin should recognize the device and will show the COM Port in the Odin screen with Added message.
8. Click on “Start” to the flashing process begin. It will take a few minutes to complete. Once completed, Odin will display a PASS!! message.
Your Galaxy Note 3 will reboot automatically after the flashing process is finished. That’s it. It will take little long time to boot for the first time. Enjoy Lollipop! (Source – XDA)


sorry.n9005 16gb
* Auto Reboot Time
* F. Rest Time
FAIL!
Re-Partition operation failed.
All threads completed. (succeed 0 / failed 1)
how to fix???????
wont work in my 16Gb either
The method is for both 16GB and 32GB variant, but there is slight difference. Read article carefully.
N9005 16GB
* Auto Reboot Time
* F. Rest Time
FAIL!
Re-Partition operation failed.
All threads completed. (succeed 0 / failed 1)
I ‘m doing wrong??