Samsung Galaxy J7 2017 variants are comes packed with good hardware specs, but sometimes it may became unresponsive, slow down or freeze for no apparent reason. In addition, your device can stuck in the welcome screen (boot loop) while tweaking the system internal. In such situations, factory reset and flash stock firmware is the only answer.
In this guide, we show you how to factory reset Galaxy J7 2017 (SM-J730F) and flash stock firmware on it. Factory resetting procedure is common for most Galaxy devices and solves most unresponsive and freeze issues, but the process will wipe your data from the device.

In case you want to reinstall stock firmware on Galaxy J7 2017 (SM-J730F), for example, if your device stuck in a bootloop or bricked while attempting to root or flash a custom ROM, you need to download correct firmware file for your device and regions. All are describing well in the below paragraphs.
Firstly, we will let you know how to factory reset Samsung Galaxy J7 2017 SM-J730F when it freezes or slow down or showing similar problems.
Also Read: How to factory reset Galaxy S8/S8+ and Reinstall Stock Firmware
How to Factory Reset Galaxy J7 via Stock Recovery
1. Power off your Galaxy J7
2. Press and hold Home, Volume Up and Power buttons together. Release keys as soon as screen turn on.
3. In the recovery screen, navigate to Wipe data/Factory reset option (use volume down key), and select it using power button.
4. Once the factory resetting is completed, select the Reboot system now option. That is it.
How to Reinstall stock firmware on Galaxy J7 2017
Note: The below guide is for Galaxy J7 SM-J730F only. Do not install it on other J7 variants.
Disclaimer: Follow the instruction at your own risk. We will not be liable if any damage occurs to your device and/or its components. It is recommended for technically talented users only.
1. Download Galaxy J7 2017 firmware for your region from here. Also, download latest version of Odin tool from here. Unzip the downloaded firmware file and Odin zip file on your Windows PC.
2. Enable “USB Debugging” and “OEM Unlock” on your phone and boot your phone into ‘Download Mode’ (Press and hold Home + Power + Volume Down buttons together).
3. Run Odin.exe file on your PC. Connect your phone to your PC. You will get a blue sign in Odin COM Port. (If not, install proper driver on your PC and start).
4. In Odin, make sure Re-partition is NOT ticked (tick only the Auto Reboot and F. Reset Time check boxes, see below screenshot for example).
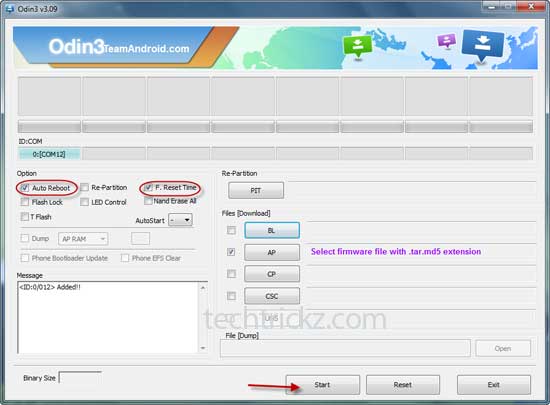
5. Select AP in Odin and choose the firmware file (with .tar extension) you have unzipped.
6. If everything OK, click the Start button. Once the ‘Pass’ message is appeared in Odin, reboot your phone.


