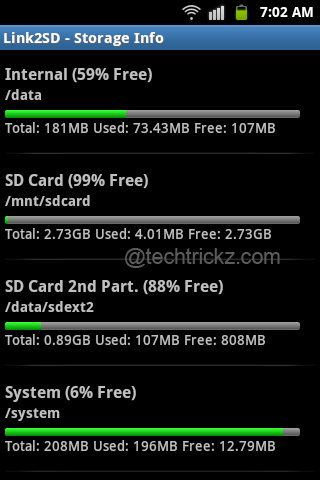
Looking for a simple solution for extending the internal storage memory of your Android Phone? So that you can install as many app as you like (subject to the maximum size you decide). For example, the popular Samsung Galaxy Ace (S5830) has only 200MB internal storage memory, so after installing few apps it begin to show “low on space” warning. You can solve this “low on space” issue by utilizing a portion of your SD card for installing apps.
Of course, some device has a “Move to SD card” option, but it will not solve your low on space issue on devices like Galaxy Ace. Here is how to extend the internal storage memory of your Android phone to install apps by a simple trick.
[Although it was tested and confirmed on Samsung Galaxy Ace (S5830), it should also work on any Android phone.]
Important Note: Backup all SD card data (songs, movies, photos, etc.) to your PC, because this procedure will erase all data on the SD card. Your phone requires at least 80% of battery charge. Also, please read below contents carefully before attempting to do the procedure.
Table of Contents
Root your Android phone
You will need to root your phone first. Rooting the phone isn’t a complicated process. You can find a suitable method for your phone at the XDA portal.
For Galaxy Ace (S5830), Galaxy Y, etc. here is a simple solution. Download the “update” zip file to your phone’s SD card. Then, boot your phone into “Recovery mode” by pressing and holding the Power and Home buttons (for Galaxy Ace) simultaneously.
Now, select “apply update from sdcard” with Volume + or – Keys and press Home key. Select “update.zip” and press Home key. Done! (More details and download available here)
Partition the SD card
Now you need to partition your SD card. There are several way to partition the SD card. You can use programs like Minitools partition wizard (required PC), but using ClockworkMode (CWM) is the simplest method (you can do it right from your phone). So, download “CWM Skin1980.zip” from here and copy it to your SD card. Then, install Link2SD app (it is free) from Play Store on your phone.
First Steps (Galaxy Ace):
1. Switch off your phone and boot into recovery mode by pressing “Power” and “Home” buttons simultaneously (it may be different on other phones, for example, Power and Vol +/-, or Power, Vol+ and Home, etc.).
2. When the phone in recovery mode, select “apply update from sd card” using the volume key, then select “CWM Skin1980.zip” saved on your SD card and press your phone’s “Home” key.
3. Now, on the “ClockworkMod Recovery” menu, select “advanced” and press “Home” key.
4. In the “Advanced and Debugging” menu, select “Partition SD Card” and press Home key to partition your SD card.
5. In the “Ext Size” menu, select the size of the new internal memory storage that you want to be. Select 1024 MB (1GB) or low for better performance.
6. Now, on the next screen labelled “swap size”, select 0M and press “Home” key. Wait a few minutes for your SD card to be partitioned.
7. Next, select “reboot recovery”, then select “reboot system now”. Your phone will reboot.
Second Steps:
1. Run Link2sd. Tap your phone’s menu key, tap “More” and then choose “recreate mount script”.
2. Select “ext 2” or “ext3? and tap OK button. Then, reboot your phone.
Third Steps: Move Installed Apps to the newly created second partition using Link2SD
Run Link2SD, tap an application that you want to move to the second partition and then tap on “Create Link”.

For applications (games, apps, widgets or live wallpapers), enable the following:

– Link application file (the .apk file itself)
– Link dalvik-cache file
– Link library file (if an app have lib files)
Note: You can automate the above process for newly installing apps. For that, from Link2SD’s settings menu enable “auto Link” option. However, the auto link method may not work properly on all devices. So check it manually after each installation of a new app.


I had mentioned in the post that this procedure will erase all data on the SD card and need to to backup SD card contents on a PC before the procedure. Please mention your SD card original size.
After the first step, my phone reboots and ALL the data on my memory card gets formatted completely and it’s maximum space shows as 2.74 GB…. i had installed Link2sd before the root on my GT-S5830i and i don’t know what to do now because my memory card’s formatted… PLEASE HELP!