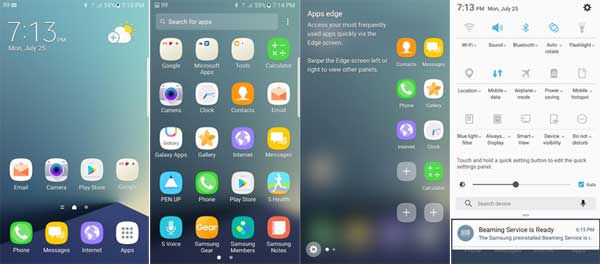
Galaxy S5 owners can now experience Galaxy Note 7 features and the highly acclaimed Grace UX with the official Note 7 port. Thanks to the Note 7 system dumb, this helps developers cook the TouchWiz ROM for older Galaxy phones. The ‘Official Pure Note 7’ port for Galaxy S5 is based on the Samsung stock firmware and brings features of upcoming Galaxy Note 7 (scheduled to release on August 2).
By installing the custom ROM ‘Official Pure Note 7’ port on Galaxy S5, users can experience Galaxy Note 7 features right now along with Grace UX and of course without the functions of S Pen and the Iris scanner. In the below guide we show you the installation instruction for the ROM on Galaxy S5.

Official Pure Note 7 Port v2 developed by the XDA contributor malbert16442 brings following features to Galaxy S5.
– TouchWiz Notes UX (Grace UI)
– Notes 7 Drop-down Menu
– Notes 7 System Menu
– Edge panels
– Always On Display
– New Smart Manager
– Game Launcher and Game Tool
– Samsung new apps
– Others
Installation Instruction for Official Pure Note 7 Port V2 on Galaxy S5
Note: Since this is a prerelease version and based on the beta firmware, you may experience bugs while using it. It is recommended to flash, only if you want to experience Galaxy Note 7 features on your device.
IMPORTANT: Before flashing the ROM, please backup your data and your EFS folder. Also, keep in mind that the process will void your device’s warranty.
Disclaimer: Follow the instruction at your own risk. We will not be liable if any damage occurs to your device and/or its components. It is recommended for technically talented users only.
Installation Instruction
1. Flash latest custom recovery (TWRP) via Odin.
2. Download [HERE] the ROM zip file (1.2GB) and transfer it to your device’s SD card.
3. Boot Galaxy S5 into TWRP recovery by pressing Home + Power + Volume up button at the same time.
4. In recovery, select ‘Wipe’ and then wipe data, cache partition and format system
5. Now, select ‘Install’ and then select the ROM zip file and flash it.
6. Reboot your device and setup your device
Note: It should take less than 10 minutes until it boots. Enjoy! Any question? Leave it in the comment section below (Source – XDA)


