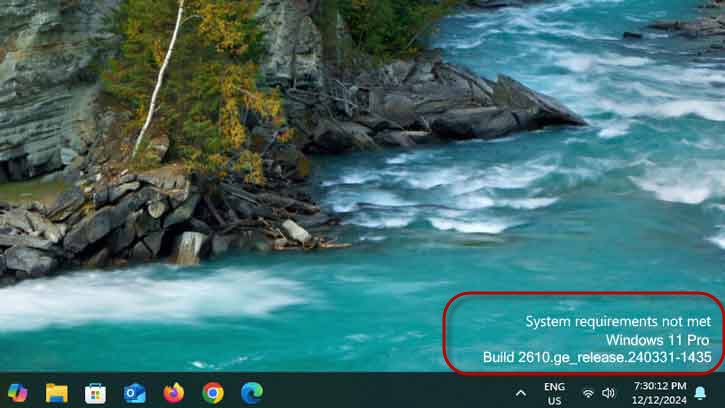
Windows 11 has specific requirements, such as TPM 2.0, Secure Boot and new processors to run on a computer. Although it is easy to bypass these rules using apps like Rufus or Flyby11, Microsoft is now strict about these technical requirements. As a result, computers running Windows 11 have started displaying a ‘System requirements not met‘ warning.
If you have installed Windows 11 on an unsupported PC, a new system update automatically detects these PCs and starts displaying a ‘System requirements not met’ watermark in the bottom-right corner of the desktop. In this guide, let’s go over how to remove the “System requirements not met” watermark from the Windows 11 desktop.
ALSO READ: How to View Startup and Shutdown History of Your Windows 11
Table of Contents
Steps to Remove System Requirements Not Met Watermark on Windows 11
There are two ways to remove the ‘System requirements not met’ watermark from your Windows 11 PC. Windows 11 Pro and Enterprise users can use the Group Policy editor or Registry editor, while Windows 11 Home users can use the Registry method.
First Method: How to Remove Desktop Watermark Using Group Policy Editor
1. First, open the Run command box (Win + R), type gpedit.msc and press Enter to open Group Policy Editor.
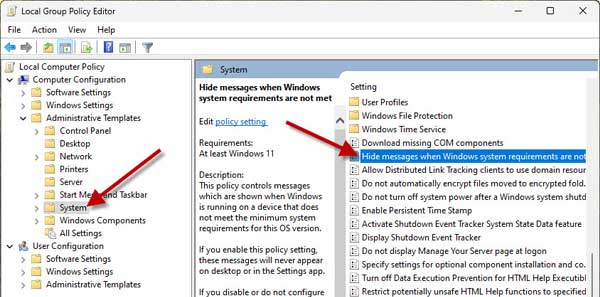
2. Navigate to Computer Configuration > Administrative Templates > System.
3. Next, find “Hide messages when Windows system requirements are not met” option on the right pane.
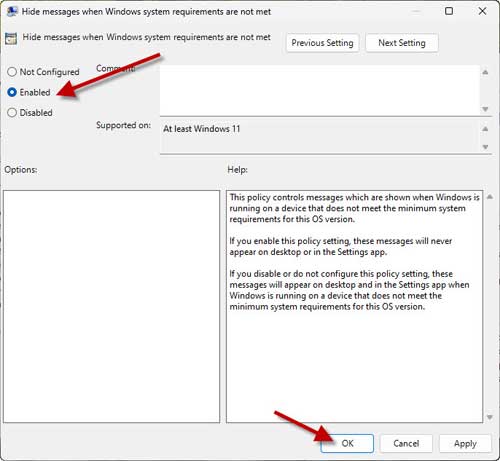
4. Double-click the “Hide messages when Windows system requirements are not met” option, select Enabled and apply changes.
5. Now, restart your computer. You will not see the ‘System requirements not met’ watermark again.
Windows 11 Home edition does not include Group Policy Editor. So users need to use the Registry Editor to remove the warning. Here is how to do it.
Second Method: Remove Desktop Watermark Using Registry Editor
Warning: Editing Windows Registry can cause serious issues to your computer if edited wrongly. Please follow the below guide at your own risk. Take a backup of the registry before performing the below tip.
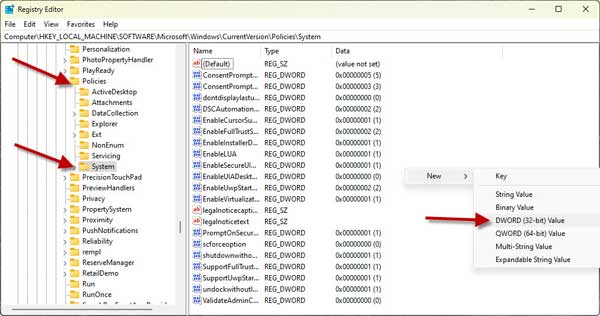
1. Open the Registry Editor on Windows 11 Home edition, and navigate to HKEY_LOCAL_MACHINE\SOFTWARE\Microsoft\Windows\CurrentVersion\Policies\System
2. Right click an empty place on the right pane and select New > DWORD (32-bit) Value option.
3. Set the new DWORD name as HideUnsupportedHardwareNotifications and change its value to 1.
4. Close Registry Editor and restart your computer to save the changes.
After reboot, the system requirements watermark will disappear from the desktop. To restore the watermark, delete the newly created DWORD from Registry.
Understanding the Reasons Behind the ‘System Requirements Not Met’ Watermark in Windows 11
The “System requirements not met” warning serves as a notification from Microsoft to users, indicating that their current device is incompatible with Windows 11 and fails to meet the required hardware specifications. The company has released a new update to identify these PCs.
Windows 11 requires Trusted Platform Module (TPM) 2.0 for a secure and future-proof computing experience. TPM 2.0 is a security processor necessary for advanced features such as encryption, Secure Boot and identity protection.
If your computer doesn’t meet the system requirements for Windows 11, the setup process will block the installation of the operating system. As a result, you won’t be able to install or upgrade to Windows 11 on devices that are incompatible.
However, the workaround given above allows you to remove the “System requirements not met” desktop watermark and run Windows 11 on older PCs with incompatible hardware. This can be a useful solution for users who want to upgrade their systems despite not meeting the official system requirements.

