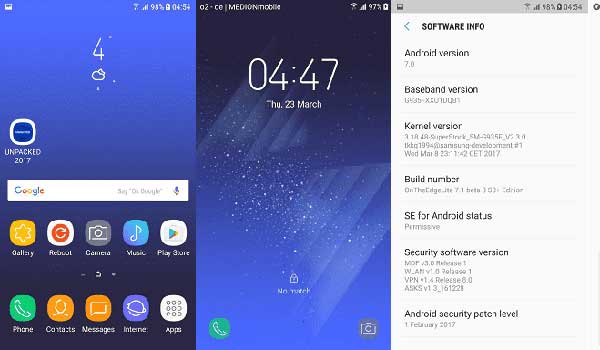
Samsung Galaxy S7 and S7 edge owners can now experience Samsung’s latest flagship Galaxy S8’s features with the OnTheEdgeLite S8+ ROM. Based on the TouchWiz Android Nougat, the ported Galaxy S8 ROM turns Galaxy S7 and S7 Edge into Galaxy S8. Not just TouchWiz UI, the ROM brings even the small details of Galaxy S8, such as the system menu, virtual buttons, etc. to Galaxy S7/S7 edge. Check out the installation guide below.
Based on the Android Nougat TouchWiz ROM, the OnTheEdgeLite S8+ port is pre-rooted, slightly debloated, battery friendly, fast and responsive. The ROM brings all the Galaxy S8 stuffs, including the new Touchwiz UX, Always on Display, motion effects, fonts, boot animation, system menu, virtual buttons, etc. Tech-savvy, rooted Galaxy S7/S7 Edge owners can install the ROM via custom recovery.

Thanks to the XDA contributor angelo27093, the OnTheEdgeLite S8+ is not just a simple custom ROM with recently leaked Galaxy S8 apps. We have found that it also includes various system files and libraries from the original Galaxy S8. They are necessary for proper operation of some Galaxy S8 features on Galaxy S7/S7 edge.
Note: The ROM status is beta, so it is not free from bugs. You cannot use it as a daily driver. Check here for latest development of this ROM.
IMPORTANT: Before flashing the ROM, please backup your data and your EFS folder. Also, keep in mind that the process will void your device’s warranty.
Installation Instruction for the OnTheEdgeLite S8+ ROM
Disclaimer: This guide is intended for Galaxy S7/S7 Edge. Follow the instruction at your own risk. We will not be liable if any damage occurs to your device and/or its components. It is recommended for technically talented users
Installation Guide
1. Flash latest version of TWRP custom recovery via Odin and gain root access.
2. Download OnTheEdgeLite S8+ Port ROM zip file for Galaxy S7 [HERE] and Galaxy S7 edge [HERE]. Transfer the ROM zip file to your device’s SD card
3. Now, boot Galaxy S7 into custom TWRP recovery by pressing Home + Power + Volume up button at the same time.
4. In recovery, choose Wipe > Advanced Wipe > and wipe Dalvik, System, Data and Cache.
5. Return to recovery main menu, choose ‘Install’, select the ROM zip file and then swipe to flash.
6. Once the installation is completed, reboot your phone. It will take around 10 minutes.
To get more details about this ROM, discussion and installation instruction, head over to this XDA thread.


