There is a plethora of custom ROMs out there for Samsung Galaxy devices, but before flashing any custom ROM, you should backup EFS partition on your Galaxy phone. EFS partition contains all data related to your phone’s IMEI, so if you accidentally wiped EFS partition while flashing a ROM, you will not be able to use your device with any mobile network. This is a common problem with all Samsung Galaxy devices.
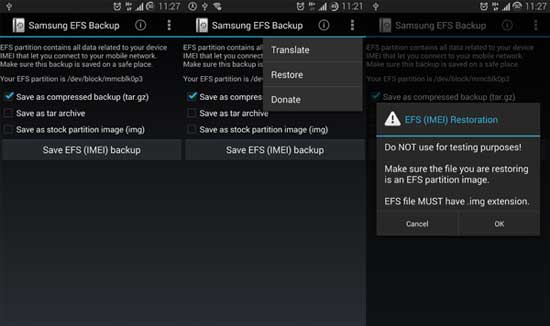
In this guide, we will show you how to backup EFS Partition on all Samsung Galaxy phones. There are several ways to backup EFS partition on Samsung Galaxy phones, but “Samsung EFS IMEI Backup” app is an easy method to backup EFS, and it helps you to keep your IMEI safe from getting corrupted while flashing a custom ROM.
Samsung EFS IMEI Backup app works on all rooted Samsung devices running Android 3.0 and later. The application can also be used to restore the EFS partition when EFS data gets corrupted and you are left unable to use your phone on any mobile network.
How to Backup EFS/IMEI on Samsung Galaxy Devices

1. Download Samsung EFS IMEI backup app from Play Store [HERE] and install it.
2. Run the app.
3. You will have three options to save EFS data: Save as compressed backup (tar.gz), save as tar archive and save as stock partition image (img).
4. Tap on Save EFS (IMEI) backup button. The backups are saved on /Sdcard/EFSBackups.
Important: Do not leave the EFS backup on your SDcard; make sure it is saved on a safe place.
Now, when you install a new ROM and the EFS partition gets corrupted, you can easily restore the backed up EFS partition. Stock partition image (img) is required for restoring EFS.
Note: For your information, EFS is a system directory, which contains IMEI, wireless MAC address, baseband version, product code, system ID, NV data, etc. If it is lost, you will not be able to use your phone with any mobile network. So, when installing a custom ROM, you should make sure that you follow all the necessary instructions to make sure that you do not mess up with your device.


![[Update] Download Samsung Stock Firmware Directly From Samsung Servers & Install via Odin Samsung-Galaxy-S10](https://techtrickz.com/wp-content/uploads/2019/03/Samsung-Galaxy-S10-218x150.jpg)