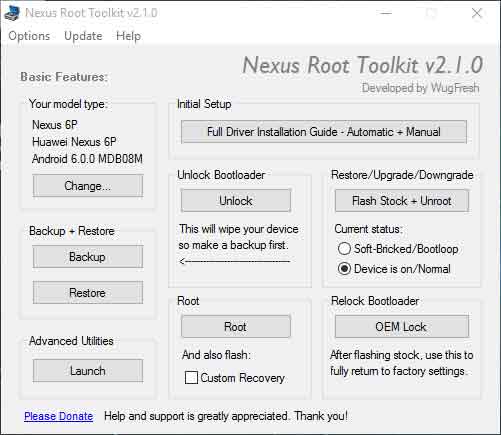
WugFresh has updated his Nexus Root Toolkit to version 2.1.0 with support for Nexus 5X and Nexus 6P and Android 6.0 Marshmallow. This Windows application helps you unlock and relock bootloader, root and unroot, backup/restore important data on your Nexus phone – all in a few clicks and without the need of ADB and Fastboot commands.
The Nexus Root Toolkit is not just a rooting tool; it lets you perform various other things on your Nexus phone. For example, you can flash firmware, flash zip files, set file permissions, generate logcats, and more. It will even download the files it needs for your Nexus device such as device drivers and factory images.
The below guide will let you know how to use Nexus Root Toolkit to root Google’s latest flagships Nexus 6P and Nexus 5X and install custom TWRP recovery.
1. Download [HERE] and install the Nexus Root Toolkit on your computer. The application can auto-detect your device and build. Select your device.
2. Ensure that your computer has the correct drivers for the device. If you have not proper driver, the Nexus Root Toolkit has an automatic driver configuration option. Click the “Full Driver Installation Guide – Automatic + Manual” button in the Nexus Root Toolkit window to get started.
3. Now, connect your phone to your computer via a USB cable (For Nexus 5X, you need to buy a USB Type-C to USB Type-A cable to connect it to the PC). After Windows finishes installing the drivers, click OK.
4. First, click ‘Backup’ button to back up your important data.
5. Now, use the ‘Unlock’ button to unlock the bootloader of Nexus 6P/Nexus 5X.
6. To root your phone, click the ‘Root’ button
Note: if you do not want to flash custom recovery, uncheck the option ‘Custom Recovery’.

The advantage of Wug’s Nexus Root Toolkit is its variety of use and easiness. No need to use commands to hack your Nexus device, it brings everything required to do all that. (source)


![[Download] Google Pixel 3 Camera with Night Sight for Nexus 6P Google-camera-with-and-without-Night-Sight-mode](https://techtrickz.com/wp-content/uploads/2018/10/Google-camera-with-and-without-Night-Sight-mode-218x150.jpg)